CHAPTER 7 - MORE ON ASANAS
This text was machine-transcribed from the printed book and may contain errors. Select the words and choose “Report a mistake”.
Alignment principles
Alignment is not just to look good and be picture perfect in the posture. There are two main purposes in learning proper alignment. First, it is to ensure that the postures are done in a way which minimises the risk of injury, and, secondly, to ensure that they are done in a way which directs the flow of prana (life energy) appropriately within the body. Different postures affect the flow of prana in different ways. Each person has a unique body with its anatomical variations. However, awareness of the following general points should help in your practice. Once you learn the basic principles, everything will be easy and intuitive. In the initial practice, listen to the body. Be aware of the feeling of the muscles stretching, and where it is felt. Do not do to the point of pain.
The Earth Element : Create a Foundation For Your Asanas
In life, the wise seek to be balanced and grounded. From there, all decisions naturally arise from a place of clarity and intelligence. The same holds true for your yoga practice. Each asana must emerge from a place of centeredness, from a strong foundation.
Pay attention to your foundation, that part of your body in contact with the ground. How is a foundation established in each and every asana? The key lies in your connection to the earth. There will be some part of your body in contact with the ground in each yoga asana. It may be your feet (standing asanas), your hands (hand balances) or your sit bones (sitting asanas).
Once the foundation is established, any asana can be safely explored with freedom and grace. From a strong foundation, the body's natural intelligence will guide the yogi deeper into the fullest expression of the asana.
Let's begin with Tadasana, mountain pose.
Grounding through the feet - Tadasana
The two feet form the foundation of this asana since they are touching the earth. . First, bring awareness to the feet, feeling the firm ground below them.
Balance the weight evenly between right and left foot.
Lift one foot at a time, stretching it as long and wide as possible, spreading the toes apart.
Place the foot down and feel all three corners of the foot - the mound of the big toe and little toe, heel, pressing evenly onto the mat
Once all three points are grounded, lift the inner and outer arch up off the ground by gently and firmly pressing the foot down at the three corners.
The grounding force of the feet will exert a force in the opposite direction facilitating the lifting of the inner and outer arches off the ground as well as the extension of the legs and spine upwards.
With the foundation established, other aspects of the asana may be explored. Activate the feet in this same way, each time they are in contact with the earth.
Take any other asana; uttanasana, utkatasana, trikonasana, virabhadrasana, or prasarita padottanasana, a few examples where the same foot to earth grounding sequence described above will be applied.
Elements of the foundation for the feet
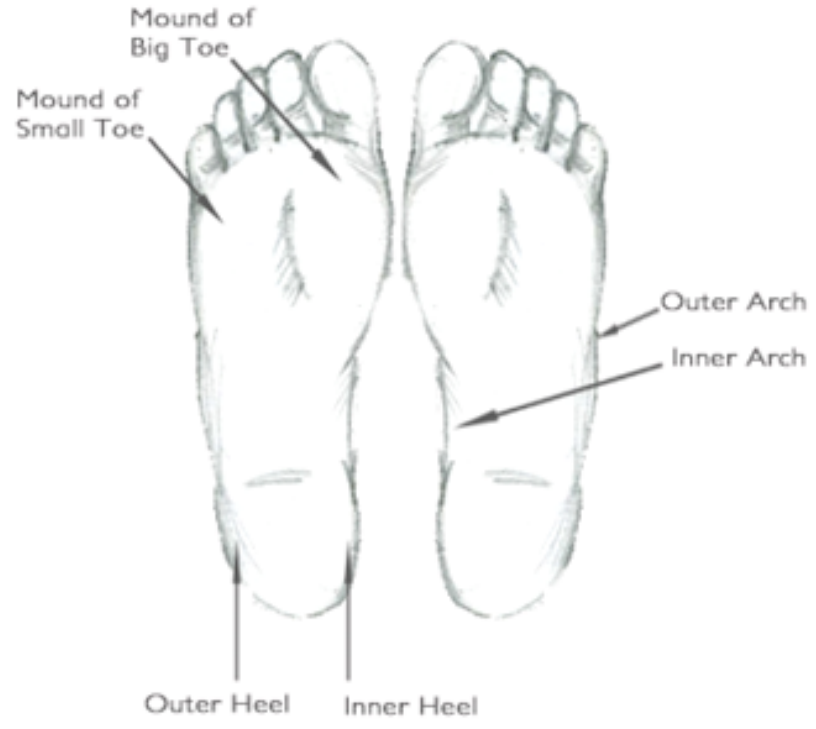
Feet foundation for Tadasana
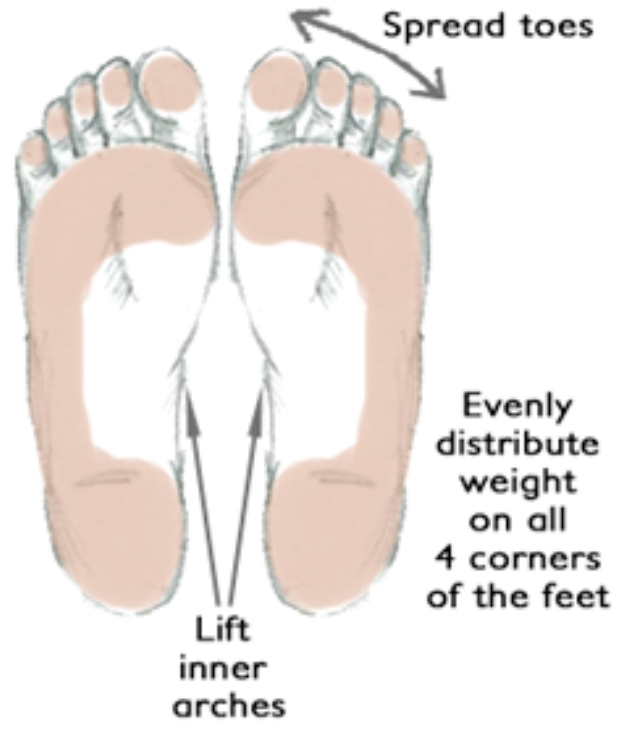
Elements of the foundation for the hands
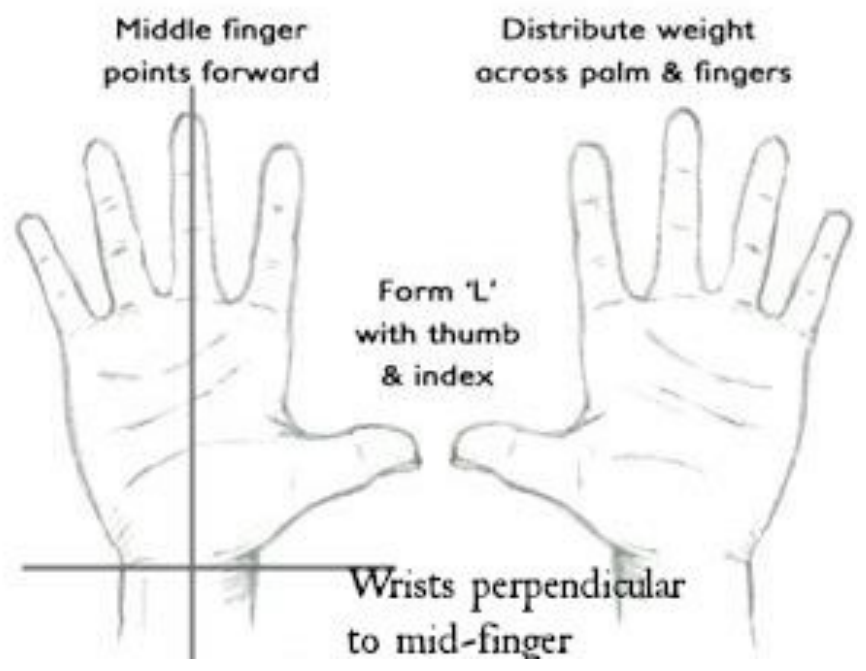
Grounding through the hands and feet - adho mukha svanasana (downward dog)
Get on hands and knees. Place hands under the shoulders and knees under the hips. Make sure the spine is fully extended. New students have a tendency to have their arms too wide and their feet too close together. If the base is out of proportion, the pose becomes unstable, the joints stressed, and organs compressed.
Lightly spread the fingers, making sure the middle finger faces directly forward. Bring awareness to the hands. Without tensing them, connect all of the joints of the fingers and the inner and outer palm into the earth. This will create a lift in the palms of the hand, reducing pressure on the wrist.
As you lift the hips to the ceiling and draw them back, and look at the feet. They should be hip-distance apart. The heels may or may not touch the ground. Contract the abdomen to the spine gently.
Grounding through the shins
In exploring another asana, ustrasana we see an entirely new grounding point - grounding through the shins. Again, return to the basic idea - that which is in contact with the earth will create the foundation. Press down firmly through the entire shin, front of the ankle and top of the foot. Then, extend the rest of the body out of the foundation of the shinbone. Here, let us think of the shins as two long feet to stand on and then lift the spine up from there.
Grounding through forearms
In sirsasana, the forearms and crown of the head provide the foundation. The pressing down of the forearms is similar to the pressing down of the shinbones in ustrasana. You literally "stand" down into the forearms and then lift the whole body out of this grounding force. When the forearms press down onto the ground, the ground will exert an upward force on the body enhancing your intention and the action of extending the spine upwards in the opposite direction into the air.
Once the Earth element is discovered, every posture will unfold intelligently from a place of strength and stability. Tapping into the natural intelligence of the body will be easy once we learn the lessons that our beloved planet Earth teaches us: to be balanced, centered, and grounded.
Learn to Rotate the arms
To have a strong foundation in the arms, learn how to both internally and externally rotate the arms at the same time. This helps you to connect to the inner wrist, open the shoulders, and broaden the upper back. To feel how this happens, when in Adho Mukha Svanasana (downward dog), bend the elbows to the side in a diamond shape. Then, rotate the elbows under and a little in. Due to the anatomy of the arms, the upper arms are naturally going to move in the opposite direction (external rotation). You will feel the shoulders broadening and feel the strength of the shoulder muscles supporting. This also prevents the hunching of shoulders towards the neck and ears. Put a little more pressure on the inner part of the hands to resist the tendency for the inner hands to lift off when the arms are rotated.
Align the Knees
Symmetrical posture
When standing in a symmetrical posture, place the feet parallel to each other. Bring awareness to the thighs, knee caps, feet and big toes. Check their position.
Now, turn the big toes and feet inward slightly till the big toes are parallel. This will enable you to rotate the inner thighs and knee caps inwards, so the knee caps face forwards. These movements will align the pelvis. Pelvic alignment is important because it affects the lower back. Aligning the feet in this way also ensures that the knees are in the same alignment as the feet and not twisted. The knees' connective tissues can be injured by twisting of the knee.
When bending forward or backward, this alignment of the knee caps and thighs is important.
Asymmetrical postures
The alignment described above is also important in asymmetrical standing postures (such as the warrior postures). The kneecap of the bent leg in front should point in the same direction as the toes. There is a tendency for the thigh and knee cap to turn in, so glance down to see that the lower thigh is externally rotated to align the knee cap to the direction of the toes.
Avoid locking the knees
The knees should not lock, or hyperextend. Hyperextension of the knees is caused by ligaments that are too lax. Always maintain a little bend, by only straightening the leg to about 90% of its extendibility. This can be done by contracting and lifting the lower thigh muscles rather than simply pushing the knee back. Slightly lifting the great toe off the ground will also engage the thigh muscles to prevent hyperextension. People with hyperextended knees usually have weak quadriceps (thigh muscles), or do not tend to engage them fully in straight-legged poses. Hyperextension can lead to serious knee injuries and arthritis.
Relax the shoulders back and down
Shoulders should not hunch forward whether in standing postures, sitting or in forward bends. To experience the right alignment; stand in Tadasana, palms facing to the front. This rotates the head of the arm bone, thus opening up the chest. Raise both arms up to shoulder level, while keeping the palms facing up. Keeping the upper arms still, bend the elbows to 90 degrees, turning the wrists so the palms and thumbs face away from your face and away from each other.
Feel the muscles around and underneath the shoulder blades firm up; press the shoulder blades into the back. This encourages the chest bone to lift and open up. The actions pull the shoulders back and down. Keeping the arms up, and back of the palms facing you, slowly move the elbows up and down about 3 inches on a vertical plane. Notice the muscles in the shoulder blades firming up each time.
Now, extend the arms to the side like in Virabhadrasana II but with the palms facing up. Feel how the shoulder blade muscles are supporting the arms. You can now turn the palms to face down and feel the difference.
Twist
The upper spine has more flexibility and rotational ability than the lower spine due to the structure of the vertebrae, discs and joints of the spine. Twisting postures should focus on rotation in the middle and upper back. Initiate the twist from the core of the body in the abdomen. Turn at the belly button to the side first, followed by the chest, then the shoulders, and finally the head and neck. Imagine each inhale lengthening the spine (both upwards and downwards) to create more space between the vertebrae, with each exhale deepening the rotation.
Bends
Create the space to bend. While the lower back has the least ability to rotate, it is the easier part of the spine to bend forward and backward. Remember not overdo it just because of its relative ease as it can lead to lower back discomfort.
There are three things to remember In bends, whether it is to the back, side or forward - i) create space between the vertebrae by extending and lengthening the spine before you go into the bend as well as during the bend – that allows the spine more room to bend. Feel the extension as you are going through the bend.
ii) bend as evenly as possible through the whole spine – don't over-emphasise the lumbar spine. The neck is part of the spine, so try not to drop the heavy head back onto the small cervical vertebrae. Lengthen the neck and keep it extended as you bend backwards.
iii) Buttocks are not tightly clenched but only lightly engaged, otherwise this will inhibit the spine's ability to move.
FAQ's about asanas
What is an asana?
Paramahamsa Nithyananda translates as: “Asanas are steady and comfortable body postures to tune oneself with the Cosmos.”
Asana is not just different postures. It has a much more profound meaning. Each body posture has its own attitude, its own way of tuning to the highest possible frequency of the Cosmos.
Just like a tuning fork needs the proper shape, composition and alignment to vibrate at a particular frequency, asanas done with awareness and the correct alignment allows the body and mind to fine-tune to higher frequencies, to reflect the cosmic energy.
By definition, any asana should have two basic qualities: sthira and sukha. Patanjali describes asana in this way - sthira sukham asanam.
Sthira means that which cannot be lost, which has become part of your bio-memory. It should feel natural to be in that posture. If after a few weeks without practice you suddenly realize you cannot perform the posture anymore, then the quality of sthira has not been achieved.
Sukha is commonly translated as comfortable. Paramahamsa Nithyananda says sukham means increasing the capacity to do the posture, to be in the posture. It means practicing continuously and experiencing the sweet pain throughout the day. Sukha does not mean luxury or pleasure. It means experiencing the sweet pain. When the right posture is discovered, you will feel the nectar oozing out of every joint. It will not be pain; it will be sweet pain. You can achieve sukham by increasing the ability to stay in that asana.
There are two ways of finding which asanas are best for you:
1) By trial and error, until you find your own sequence, or
2) By the guru's instruction
Is alignment important in asanas?
Asanas allow you to align the individual consciousness to the superconsciousness. The body is like a mirror, which you can turn directly towards the light to reflect the original source. Asanas are tools to establish this alignment, where the body-mind and being, integrate themselves for a single purpose of experiencing and radiating the superconsciousness, the eternal bliss, nithyananda.
Where should you keep your attention during asanas?
Most people when coming to a yoga class have their attention on many things, other than themselves. It is easy to get caught into looking at the teacher or other students, especially if they are able to perform aesthetically appealing postures.
Bring your awareness to one of the following: The soft ujjayi breathing as you inhale and exhale.
A particular point or drishti e.g. the tip of the nose or the ajna chakra, the brow center.
The sensations of movement of the particular parts of the body involved in the posture when moving into the posture and/or the sensation of the inner energies of the body
Allow any experience that comes out of awareness to happen. Some asanas may draw your attention to a particular energy center, in which case, let this process happen naturally, without physical or mental tension. Always connect to the body as a whole, not as fragments. Be expansive and all-inclusive. Let it be a process of self-discovery with intense enthusiasm.
What are the benefits of asanas?
Hatha Yoga Pradipika(1:17) says that one gets steadiness and firmness of body and mind, disease lessness and lightness and flexibility of the limbs.
The physical benefits of asanas are multifold when done with awareness and proper breathing. Each asana has unique and specific effects on the different body systems, regulating and strengthening those body systems.
The practice of asana with awareness will immediately reduce inner chatter, bringing you to the experience of pratyahara and dharana as described by Patanjali. From there, it is ready take a jump into the state of dhyana or meditation and samadhi, the ultimate yoga.
Asanas help open up blockages in the body’s energy flows called nadis and energy centers called chakras so that the vital life force can reach every part of the body keeping it healthy.
Asanas are stepping-stones to experiencing higher consciousness.
Are there contraindications to performing asanas?
Yes, there are certain contraindications for specific asanas and categories of asanas. The list of contraindications for the most common asanas can be found in Appendix II of this book.
Any person attending a yoga class should be aware of the possibility of overstrain during practice, especially if the postures are not performed according to the instructions, or outside the comfortable limit of the person. Each individual must assume full responsibility for his or her yoga practice.
Practice ahimsa or nonviolence with regards to your body. Be your best friend while practicing and know when it becomes too much for the body.
What to do just before practicing asana?
Once you become familiar with the series of asanas (postures) practiced in Nithya Yoga, develop the habit of taking a moment to visualize you in that posture before performing each asana. Remind yourself of the space you are creating.
When you take a moment to mentally perform the posture, you are awakening the body’s muscle intelligence. When the body is prepared mentally, when this visualization is practiced, the body will flow harmoniously into the posture. The entire asana practice will become easier and more enjoyable.
What are important points remember during the practice?
While performing yoga asana, try to consciously do the following:
Smile softly to yourself. Avoid showing strain and tension showing on the face. It can change your entire performance and experience of the posture.
Keep the eyes soft, wide and always steady.
For all balancing postures, always concentrate the gaze on one point in front of you or on the floor.
When the eyes are still, the mind will be still and therefore the entire body will be still.
Once you are in a posture, do not shift or fidget. If you are uncomfortable, come out of the posture and repeat it with even more awareness.
While performing the postures, remember that you are an embodiment of complete, blissful energy. With each movement, you are moving the bliss.
Each time you breathe, you are inhaling bliss energy and exhaling bliss energy.
What is breathing like during asanas?
The breath is the heart of every posture. Smooth and relaxed breathing will promote a calm mind. The breath will allow you to ease into the posture, maintain the posture and deepen the intensity of the posture.
The breath and the movement must flow in a harmonious togetherness. Generally, unless otherwise specified, all asanas that open the chest are done on inhale and all others that close the chest are done on exhale.
The quality of the breath must be smooth and easy. It is recommended that as far as possible breathing in asana should be done in ujjayi pranayama. Breathing in the movement enhances the effect of the asana in the specified area. It also increases awareness and naturally leads to meditation in the practice itself.
After achieving the firm posture through the right practice and balancing technique, we should learn the practice of expanding our life energy, which is pranayama. Pranayama will be seen in the next section.
Vinyasa krama
The intelligent linking of postures that forms a complete sequence in the practice session is called vinyasa krama. The word 'vinyasa' means 'joining or linking' and 'krama' means 'processes. 'Vinyasa' is derived from the Sanskrit term 'nyasa' which means 'to place', and the prefix 'vi' meaning 'in a special way'. In yoga, this refers to the succession of postures undertaken with a single focus, which allows a harmonious flow.
Vinyasa krama is the wisdom of the Yoga tradition, which states that a practice must be done to suit our life situation. The correct linking of individual asanas and appropriate breathing in a flowing sequence creates a deep physiological impact.
In Vinyasa Krama, asana are performed with a conscious linking of the breath with the movement. If your intention is to practice asana to realize the Self, every breath you take will help break down your sense of separation from others.
The vinyasa method is a step-by-step process that takes into account the pros and cons of a single asana, a situation or an approach. That is why in an asana sequence, there are always preparatory postures to get to the main asana and counter-poses to relieve any tension. It is important to come back into a position from which we can comfortably resume our everyday activities. For example, it is not enough to want to climb a mountain. It is important that we know how to climb up the mountain, how to stay there and how to climb down. This understanding and preparation is what vinyasa is all about.
Surya Namaskar – Sun Salutations
Hatha Yoga Pradipika does not mention the surya namaskar. Surya Namaskar came about later. It is a sequence of twelve asanas, of which there are eight different ones in the sequence while the other four are repeated. Paramahamsa Nithyananda recommends that one works gradually up to doing 108 surya namaskars in one session without stopping.
The practice when done with awareness, dedication, and focus, synchronized with the breath and in the right context brings one to the space of completion. Surya namaskar practice is a practice in the expression of gratitude and surrendering to the cosmic energy, giver of life. The effect on the individual mind, body, intellect and spirit is incomparable. Early morning is the best time for this practice, facing the east where the sun rises.
An essential part of this practice is moving with the breath. Surya namaskar is done dynamically with the appropriate breathing. The general rule of thumb for the breathing applies. One inhales when the body or chest opens up and exhales when it closes. If the breathing gets too rapid, stop the practice and rest for a while before resuming or stop for the day. Initially, practice at a gentle slow speed, moving gracefully, feeling the stretch and elongation of the body.
Another important component of the practice is the surya namaskar chant. Each Sanskrit mantra confers a different remembrance of the sun, which carries deep meanings that affect the body, senses, feelings and spirit when chanted with deep surrender. The sun refers to both the external sun, the giver of life and the inner sun which is eternal.
There are different ways of chanting in the practice. A mantra can be chanted aloud at the start of each surya namaskar or a specific mantra chanted before each asana is performed. The chanting evolves to mental chanting, and eventually, the mantra is only vibrating inside as one move through the sequence.
The Surya Namaskar works on all body parts, every organ, every system, and every chakra. It strengthens the lungs, heart, circulatory, nervous and musculoskeletal systems. It also burns calories, making it an excellent practice for those in the process of losing weight. A feeling of increased energy and happiness is cultivated with consistent and regular practice.
In every Nithya Yoga class, we start the asana series with six to twelve repetitions of Surya Namaskar. Of all the asana practice, the Surya Namaskar is considered a very effective way to limber up, tone, stretch and strengthen the entire body and the spine. Surya Namaskar is regarded as the king of asanas.
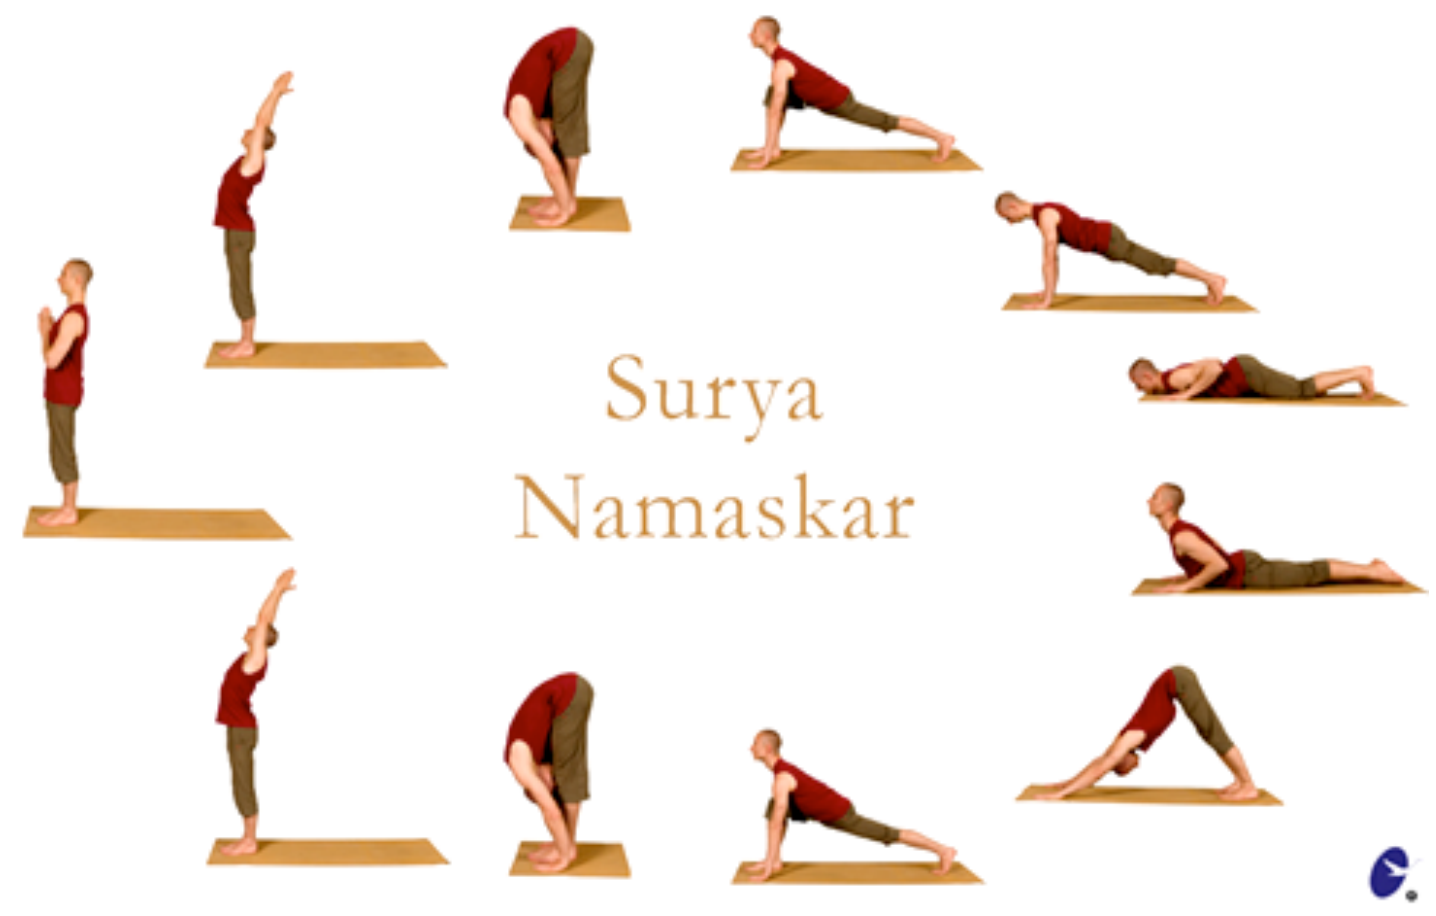
Once you are familiar with Surya Namaskar, you can take a minute to visualize your body performing one repetition. This will awaken your muscle intelligence and memory. This visualization will allow your body to flow harmoniously into the posture, as opposed to struggling and fighting to move through the sequence.
The asanas in the sequence are named as follows:
• Tadasana with Atmanjali Mudra
• Utthita Tadasana
• Uttanasana
• Ashwa Sanchalasana - lunge
• Dandasana
• Ashtanga namaskara
• Bhujangasana
• Adho Mukha Svanasana
• Ashwa Sanchalanasana
• Uttanasana
• Utthita Tadasana
• Tadasana with Atmanjali Mudra
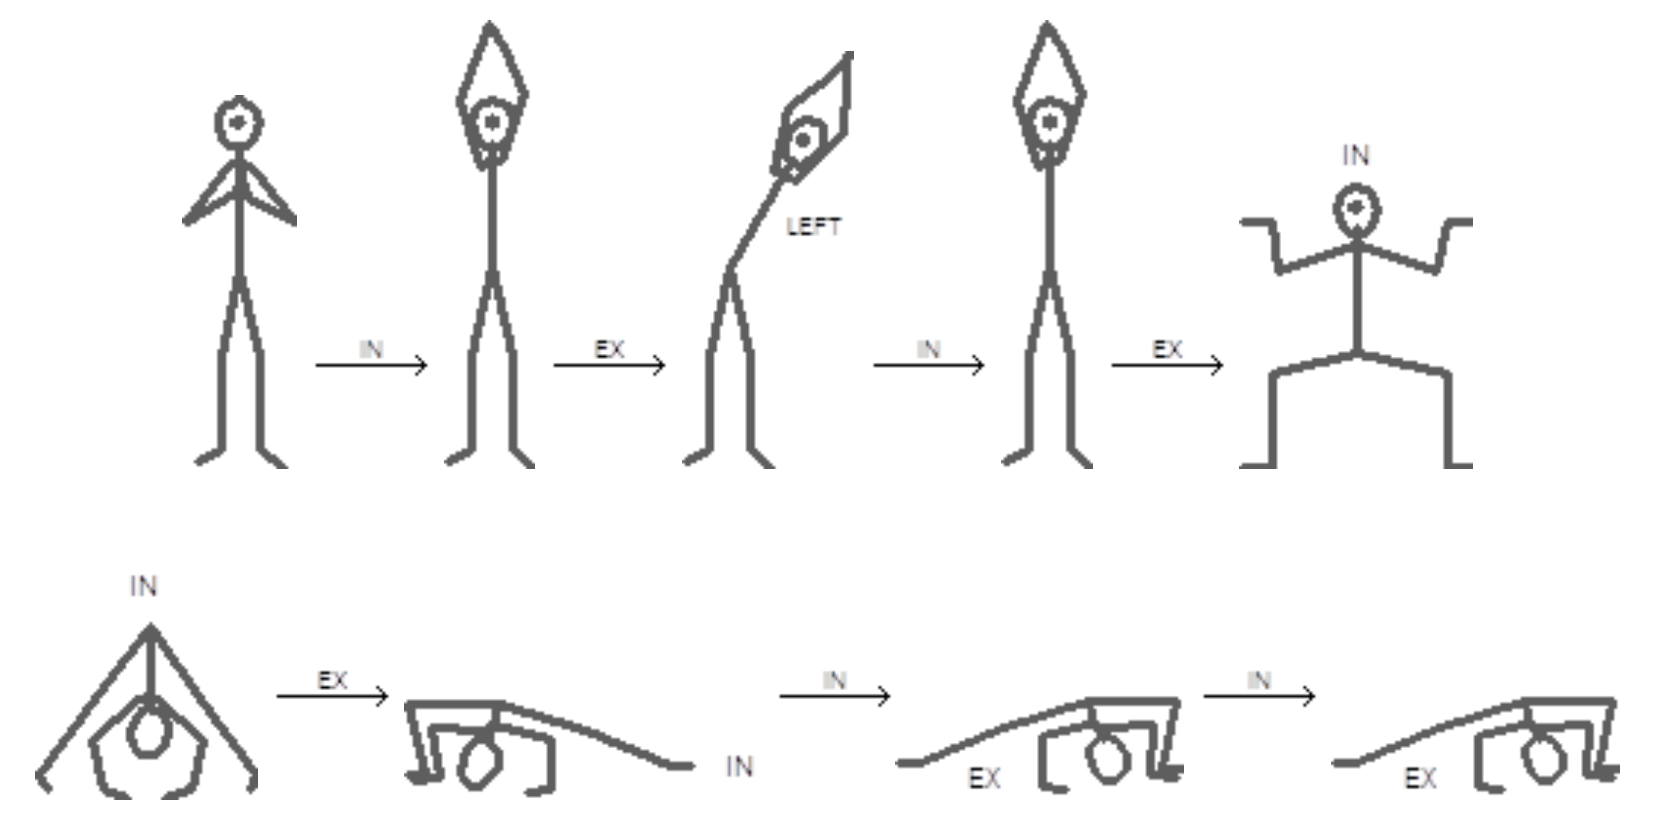
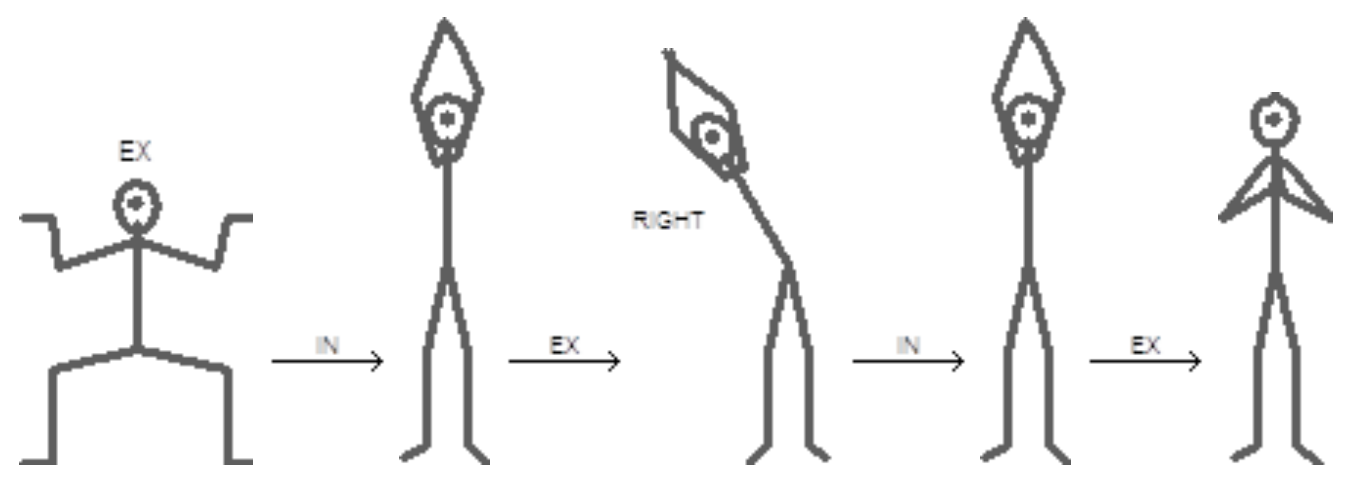
Chandra Namaskara - Moon Salutation
Chandra Namaskar is a flowing vinyasa sequence where the practitioner salutes the feminine aspect of energy and divinity, or Devi, represented by the moon.
Basic asanas for Nithya Yoga
Standing poses
Tadasana, Uttanasana, Utkatasana, Trikonasana (classical and parivritta), Parsvottanasana, Virabhadrasana I and II, Parsvakonasana
Balancing poses
Vrksasana, Garudasana, Utthita Hasta Padangusthasana, Pada Pidanasana, Mayurasana, Bakasana
Sitting & kneeling poses
Sitting: Sukhasana; Vajrasana; bhadrasana, muktasana, prana mudra, ardh padmasana, padmasana, swastikasana, siddhasana (guptasana), gorakshasana, veerasana
Seated Twist: Ardh Matsyendrasana
Forward Bend
Paschimottanasana, Shashankasana, balasana
Back bend
Pursvottanasana; Ustrasana
On hands and knees
Marjaryasana - Cat-Cow, Adho & Urdhva Mukha Svanasana, Vyaghrasana - tiger pose
Prone poses
Bhujangasana, shalabasana, makarasana, shalamba bhujangasana, Niralambanasana, Dhanurasana
Supine poses
Savasana, apanasana, pawanmuktasana, urdhva prasarita padasana, matsyasana
Inverted poses
Viparita Karani, sarvangasana, halasana
Preparation sequence
Joint Warm-up Series: Standing Exercises
Full Body. Stand in the center of the mat. As you inhale, rise up on the balls of the feet as you sweep the arms up over the head and hold the balance. Extend the fingers and arms to stretch the spine. Exhale lowering the arms and heels to the ground. Repeat 6T.
Ankles. Place the hands on your hips. Lift the right leg, point the toe and rotate the foot 6T in one direction. Then rotate the foot 6T in the opposite direction. Further stretch the ankles by pointing the toes down then pulling them up to face you. Do 6T. Bring the foot to the floor. Repeat with left foot.
Bend the knees and hold the foot up behind you with one hand. Keep holding the foot and stretch the leg back and up into Natarajasana. Repeat with the other leg.
Hips. 1) Hand on hips. Move the hips clockwise 6T as if your hips are cleaning the inside of a barrel. Do not move the shoulders. Then move the hips 6T anti-clockwise. 2) Lift the right foot off the floor, balancing on the left. Point the toes forward, keeping the leg straight. Rotate the whole leg from the hip clockwise then anti clockwise, without resting the foot on the ground. Repeat with other leg.
Shoulders. Keeping the arms loose, swing them forward and backward, back and forth. Lift the arms horizontally to shoulder level.
Keeping the arm straight and the palm upright, make small circles with the arms several times in both directions.
Place fingertips on the shoulders. Rotate the elbows 6T in one direction making wide circles. Repeat in opposite direction. Inhaling up, exhaling down, allow the elbows to touch in the front, and spread as far back as possible.
Keeping the arms by the side of the body, lift the shoulders as high as possible in the direction of the ears. Hold for 1-2 seconds and drop them suddenly. Repeat 6T.
Wrists. With relaxed arms hanging down, rotate the wrists in a circle, involving all the fingers in the rotation, as if a dancer's hand. Do 6T in one direction, and repeat in the opposite direction.
Clench the hand into tight fists, then open wide. Do 6T with both hands simultaneously.
Neck. 1) Bring the chin to the chest, then look up, pointing the chin up, keeping the jaw shut. Repeat 6T.
2) Look over the left shoulder, then over the right. Repeat 6T. 3) Tilt the head sideways towards the left shoulder, then right. Repeat 6T. 4) Very, very slowly, rotate the head to its maximum range of motion, keeping the jaw closed, drawing a circle in the air with the chin, 6T in one direction then 6T in opposite direction.
Face: clench the muscles of the face, cheeks, eyes. Hold the tension and then open eyes and mouth as wide as you can. Repeat a few times to activate the blood circulation and energize your face.
Body Energizing Exercise
Instructions
Stand straight, weight evenly balanced on both feet, the whole body relaxed. Tense and relax the entire body, part by part, following the instructions below. Keep tension only on the stated part while relaxing the other parts of the body. Remember to breathe deeply throughout the exercise.
1) Curl all the toes and tense the feet intensely, holding the tension for 30 seconds, then suddenly relax. Move the feet.
2) Slightly bend the knees and tense the calf muscles intensely. Hold the tension for 30 sec, and suddenly release the tension. Shake out the legs.
3) Keeping the legs straight, tense the thigh muscles as much as possible. Hold the tension for 30 sec, then release suddenly. Shake out the legs.
4) Tense the buttocks as intensely as possible. Hold the tension for 30 sec, and suddenly release.
5) Tense the whole abdomen as much as you can. Hold the tension for 30 sec, and suddenly release. Take a deep breath, releasing the abdominal muscles.
6) Tense the lower back muscles, curling the tailbone upwards. Hold the tension for 30 sec, and suddenly release. Move the hips to ease the tension.
7) Tense the chest muscles. Hold the tension for 30 sec, and suddenly release.
8) Tense the upper back muscles, bringing your shoulder blades together. Keep the arms relaxed. Hold the tension for 30 sec, and suddenly release. Rotate the shoulders to ease the tension.
9) Tense the entire arms and the fists as much as possible, as if you are holding a huge weight in each hand. Hold the tension for 30 sec, and suddenly release. Shake the hands and arms.
10) Tense the neck and every muscle of the head, mouth, cheeks, eyes, forehead, as intensely as possible. Hold the tension for 30 sec, and suddenly release. Open the mouth and eyes wide then relax the face muscles.
11) Now simultaneously, tense the whole body, from head to toes. Hold the tension for 30 sec, and suddenly release. Shake out the whole body.
12) Stand relaxed, eyes closed basking in the energy of the rejuvenated you.
Revitalizing body massage and tapping exercise
Instructions
You can sit on the ground or on a chair for this activity.
1) With your fingertips, tap your skull, on top, side, front and back of the head.
2) Using the ring and middle fingers, tap the temples, the point between the eyebrows, around the eyes, the cheeks, the point below the nose, the chin.
3) Gently tug at and pull the earlobes and all part of the ear. Then, gently massage the parts between the thumb and index finger.
4) Keeping the chin slightly tilted in, use thumbs to massage the parts in the back of the head where the base of the skull meets the neck.
5) Press the neck muscles with the flat pads of all the fingers. Cross right hand in front of chest to press left side of neck. Change hands to massage the other side of neck.
6) Moving on to the shoulder, press the muscles again with the pads of four fingers. Change hands to massage the other shoulder.
7) Cup the hands and start tapping the whole body, nicely and energetically starting from the shoulders, moving to the shoulder blades, arms, chest, abdomen, lower back, hips and buttocks, front-side-back and inside of the thigh muscles, knees, calves, and both feet one by one.
8) Sit quietly, bringing awareness to the inner vibrant energy radiating through the entire body.