SECTION 4: Day 1 – Chest
This text was machine-transcribed from the printed book and may contain errors. Select the words and choose “Report a mistake”.
Total Duration: Approx. 60 min
1. Start with Pre-workout Session. See section 1 for instructions.
2. Continue to Chest Workout below.
3. Go to Core Workout. See section 3 for instructions on core.
4. Finish with Post-workout Session. See section 2 for instructions.
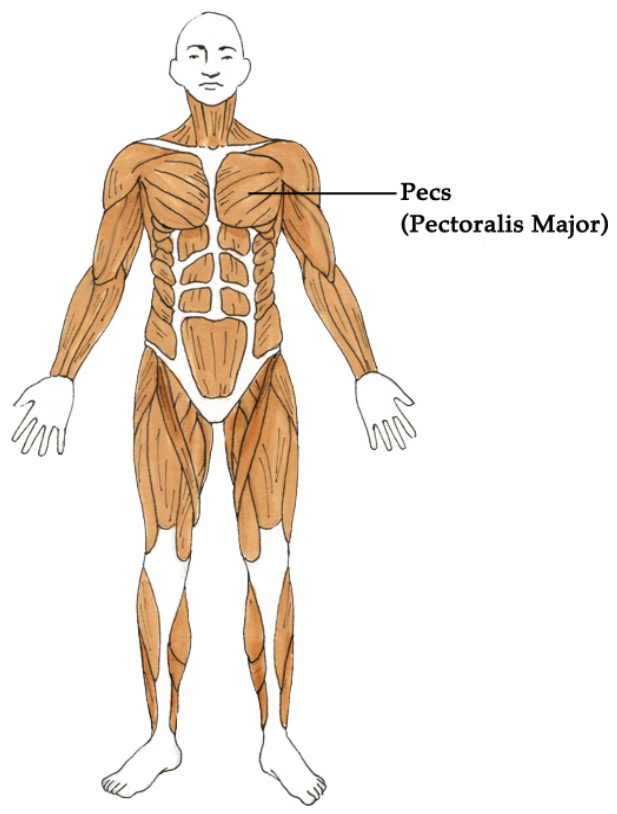
Chest Muscles
Exercise 1: Flat Chest Press
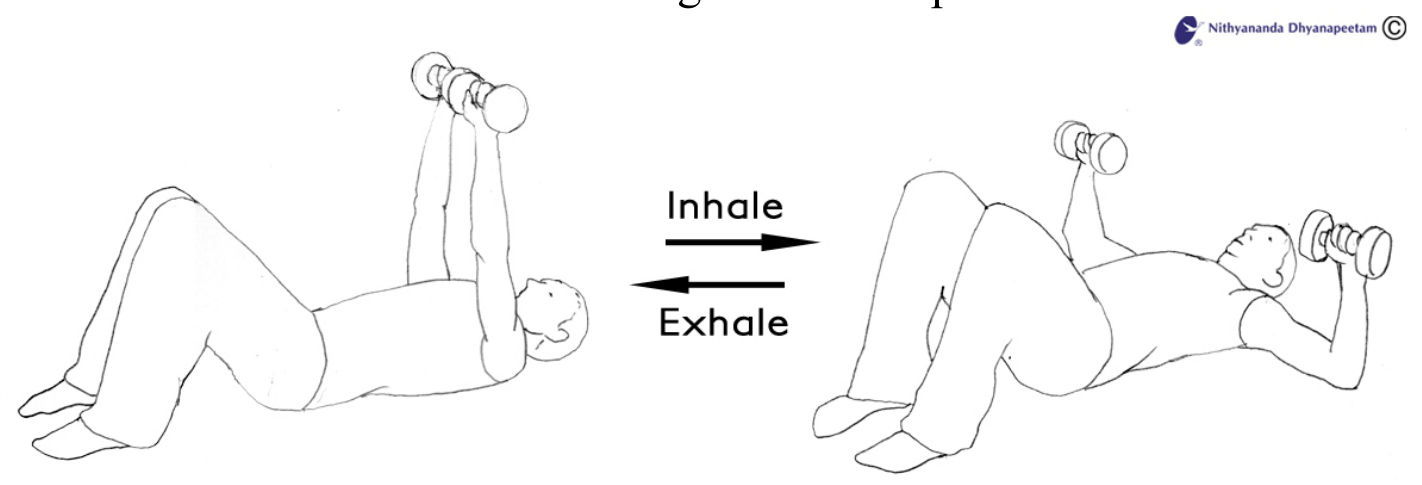
1. Keep dumbbells near your hips and lie on your back, bend your knees, keep your feet on the ground. Use the bench if available. 2. Pick up the dumbbells.
3. Start Position – Hold a dumbbell in each hand, turning the palms to face your knees.
4. Extend your arms without locking the elbows. Keep a slight bend in the arms. Engage the abdominal muscles with each movement. Dumbbells ends are almost touching.
5. Bend the elbows and lower the dumbbells.
6. Use the chest muscles to push the dumbbells back to the start position. Keep full control of the dumbbell movement at all times.
Beginners – Lighter weight. 12 – 15 reps x 2 sets Intermediate – Heavier weight. 8 – 12 reps x 2 – 3 sets
Exercise 2: Chest Flies
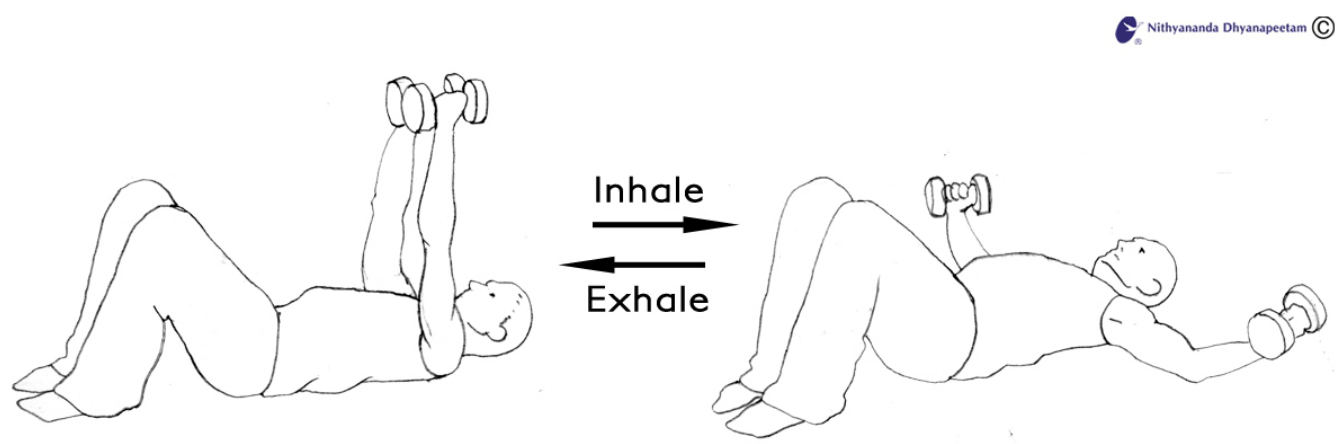
1. Lie on the floor. Bend your knees, feet flat on ground. Keep dumbbells near the hips. Use the bench if available.
2. Start Position – Engage your abdominals and pick up the dumbbells. Palms face each other, dumbbells touching.
3. Keep elbows slightly bent. Open the arms out and down to the sides until the upper arms touch the floor or just below chest level if on a bench. This is the end position.
4. Squeeze the chest muscles to bring the arms up to start position. It is as though you are hugging a tree.
Beginners – Lighter weight. 12 – 15 reps x 2 sets
Intermediate – Heavier weight. 8 – 12 reps x 2 – 3 sets
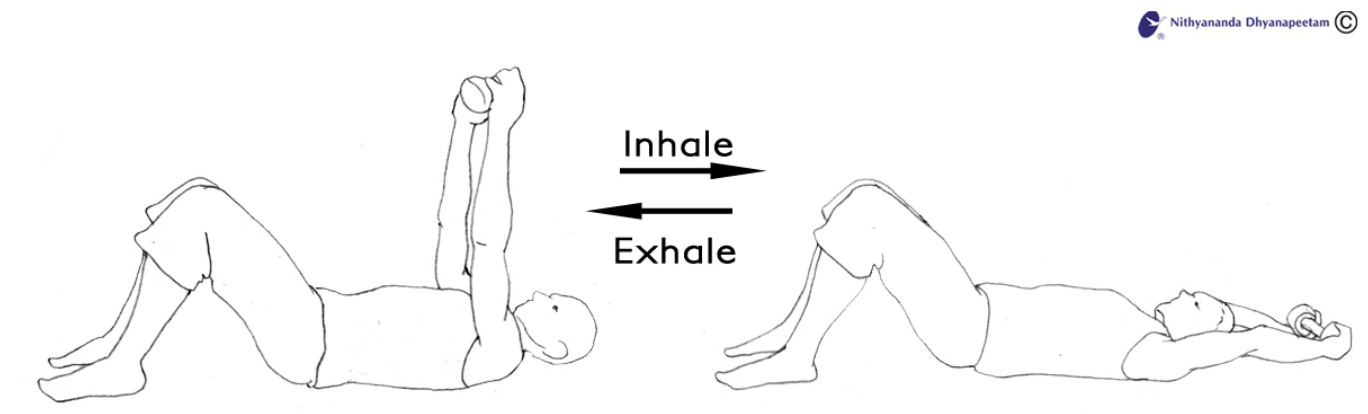
Exercise 3: Chest Pull-Over (use 1 dumbbell)
1. Keep the dumbbell near your hip and lie on the floor. Bend the knees, feet flat on the ground.
2. Start Position – Pick up the dumbbell and hold it in a vertical position directly above your chest. Two options available for holding the dumbbell:
Option 1: Hold both ends of the dumbbell with one hand on each end. The dumbbell will be in the horizontal position.
Option 2: Hold the dumbbell in a vertical position, with the top plate in your hands. Palms face up.
3. With a slight bend in your elbows lower the dumbbell over your head towards the floor as far as you comfortably can or until the dumbbell lightly touches the floor.
4. Pull the dumbbell up to start position by keeping your arms slightly bent.
Beginners – Lighter weight. 12 – 15 reps x 2 sets
Intermediate – Heavier weight. 8 – 12 reps x 2 – 3 sets
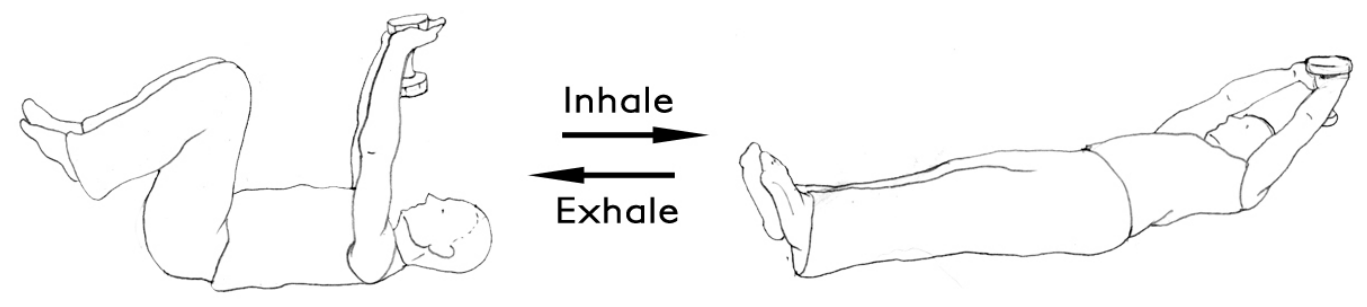
Intermediate to advanced variation: lift the feet off the ground during the exercise, and extend the legs as you lower the dumbbell. Extend legs to a comfortable height without arching the lower back. Keep lower back close to mat. Come back to initial position by folding the knees to the chest. See Level 2 image below.
Chest Pull-Over – Level 1
Chest Pull-Over – Level 2
Exercise 4: Push-Ups
This exercise works the core, arms and shoulders. Core muscles include pelvic floor, abdominals, back and hip muscles. These deeper muscles are not normally see .
Tip: Use of push up bars takes the stress off the wrist joints and increases the range of movement.
Beginner – Modified push ups: 5 – 10 reps x 2 sets Intermediate – Regular push ups or a combination of regular and modified: 10 – 12 reps x 2 sets
Push -Ups
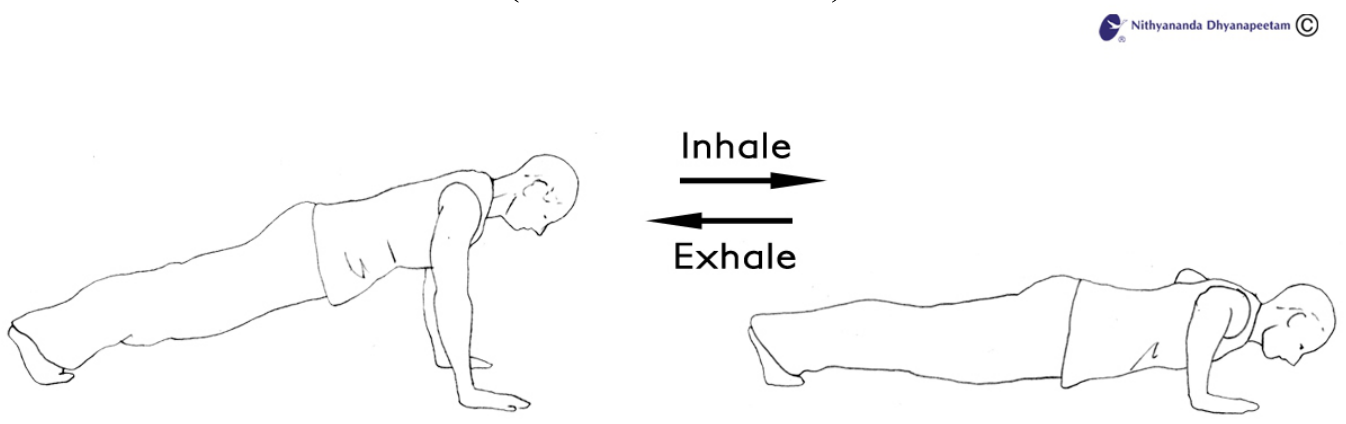
1. Start position for Regular push-ups: Lie on your belly with hands on the ground wider than the shoulder width apart at the chest level. Spread your fingers and press them firmly into the ground. Keep feet together and legs extended straight. Curl toes under. For Modified push-ups: Lie on your belly with hands wider than shoulder width apart at chest level. Press the knees against the floor and lift the feet off the ground. You may cross the feet at the ankles.
2. On the exhale, engage thigh and abdominal muscles and push the body up from the ground, straightening the arms. Keep the legs together and extended straight. Hips and abdomen are in line and not sagging. For the modified version, push up by extending the arms, coming up to the knees with the feet crossed at the ankles. Hips & abdomen are in line and not sagging at hips.
3. On the inhale, bend the arms at elbows to lower your body close to the ground but not touching the ground. Do not sag at the hips when lowering down.
4. Repeat movement of push up the desired number of reps.
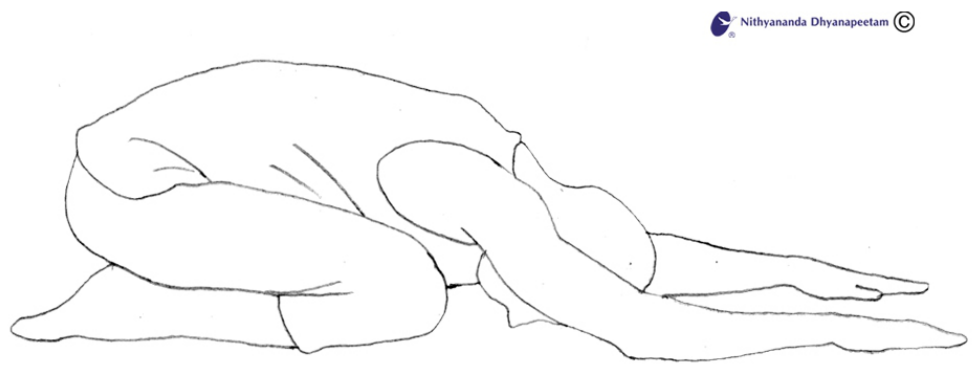
5. After completion of desired number of reps, sit back on your heels with arms extended in front of your and rest your forehead on the floor (Shashankasana).
Shashankasana – Rest Pose
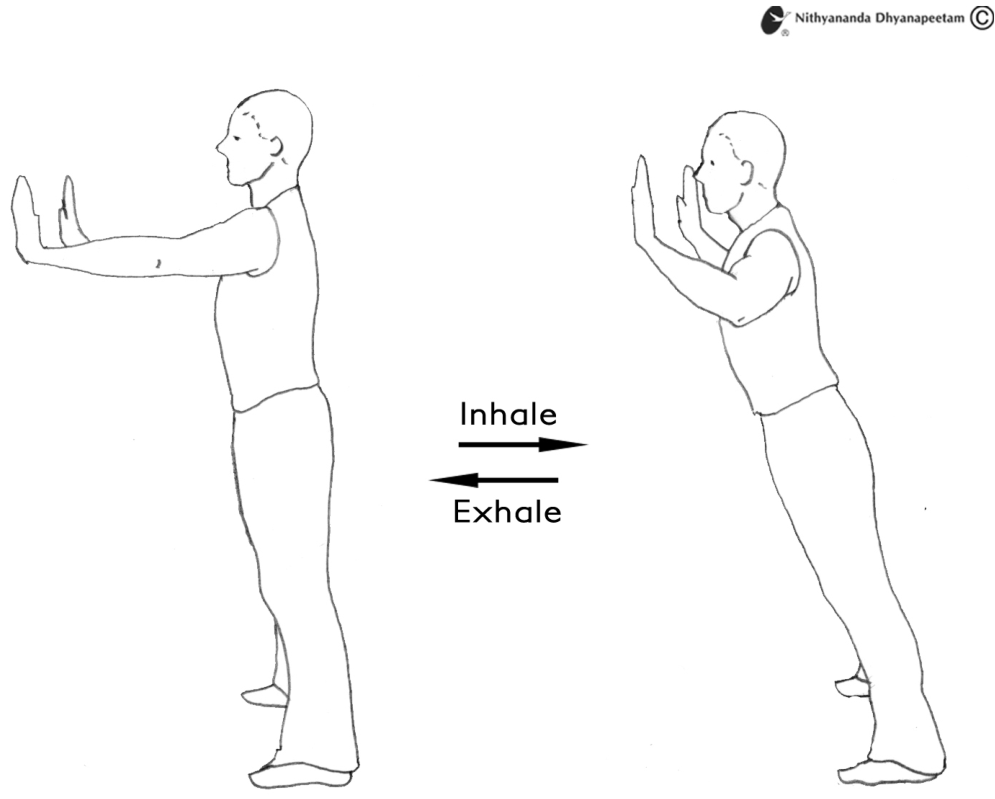
Modified Wall or Table Push Ups for Beginners
1. Starting Position: Find either a sturdy bench or table which will not move with your weight on it, or face a wall. Place your hands wider than shoulder width apart on the edge of the table with your thumbs underneath the edge and fingers on top. You can also do this against the wall, where you place your hands at shoulder level and straighten your arms. 2. Take a long step back at least 1 m or 3 ft and keep your feet together. Come up to the balls of your feet. Extend your arms. Engage the thigh and abdominal muscles to hold the body in this posture. Body, legs and head are in a straight line and at an angle to the bench/table or wall. Softly fix your gaze at a spot in front of you.
3. On the inhale, bend the elbows and lower your body till the nose and full body come close to table/wall. Keep the body and legs in a straight line.
4. On the exhale, brace your abdominals and thighs to push back to the starting position. Repeat desired number of reps.
5. The higher the table or the placement of the hands on the wall, the easier it will be to do the modified push up.
Inhale
Exhale
Day 2 – Arms
Total Duration: Approx. 60 min
1. Start with Pre-workout Session. See section 1 for instructions.
2. Go to Arm Workout. See below for instructions.
3. Continue to Core Workout. See section 3 for instructions.
4. End with Post-workout Session. See section 2 for instructions.
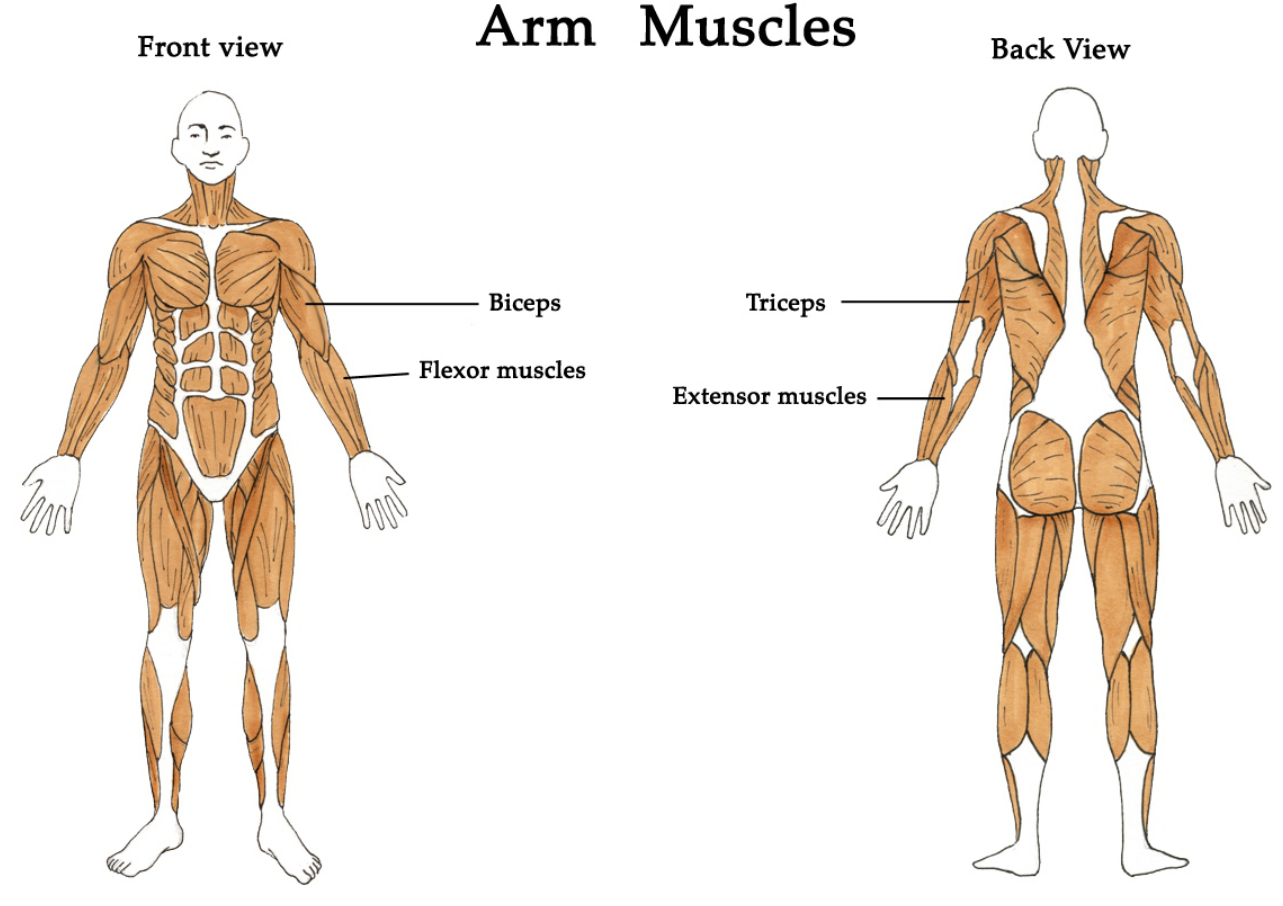
Arm Muscles
Exercise 1: Standing Dumbbell Curls
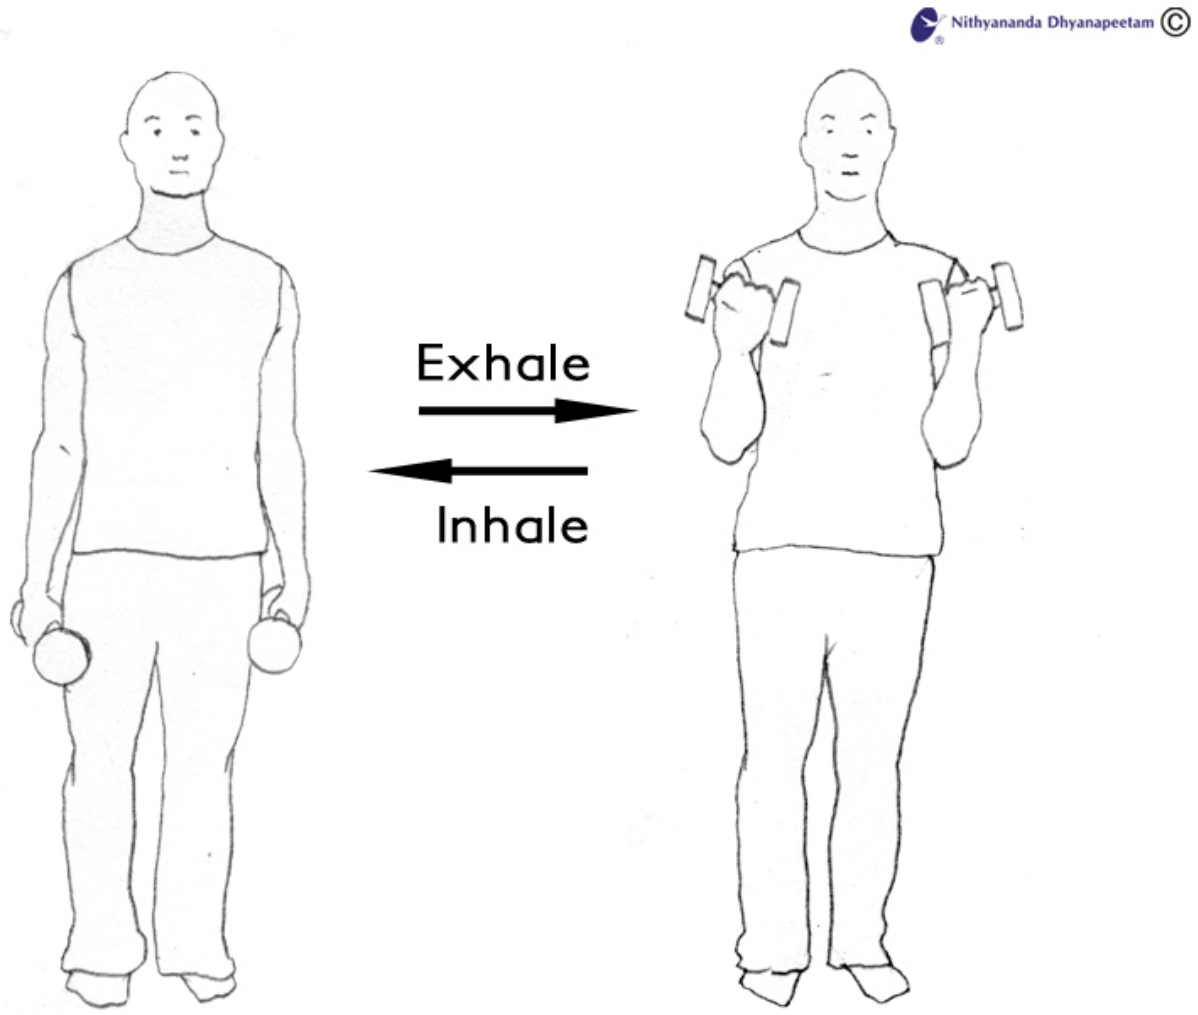
1. Start position – hold dumbbells at the side of your body, palms facing body.
2. Bring dumbbells up turning wrists to face palms up. Keep the elbows close to ribs, until the dumbbell plate almost touches your shoulder.
3. Lower dumbbells to start position. Remember to brace abdominals during the exercise.
Beginners – 12 – 15 reps x 2 sets. Intermediate – 8 – 12 reps x 2 – 3 sets.
Exercise 2: Hammer Curls
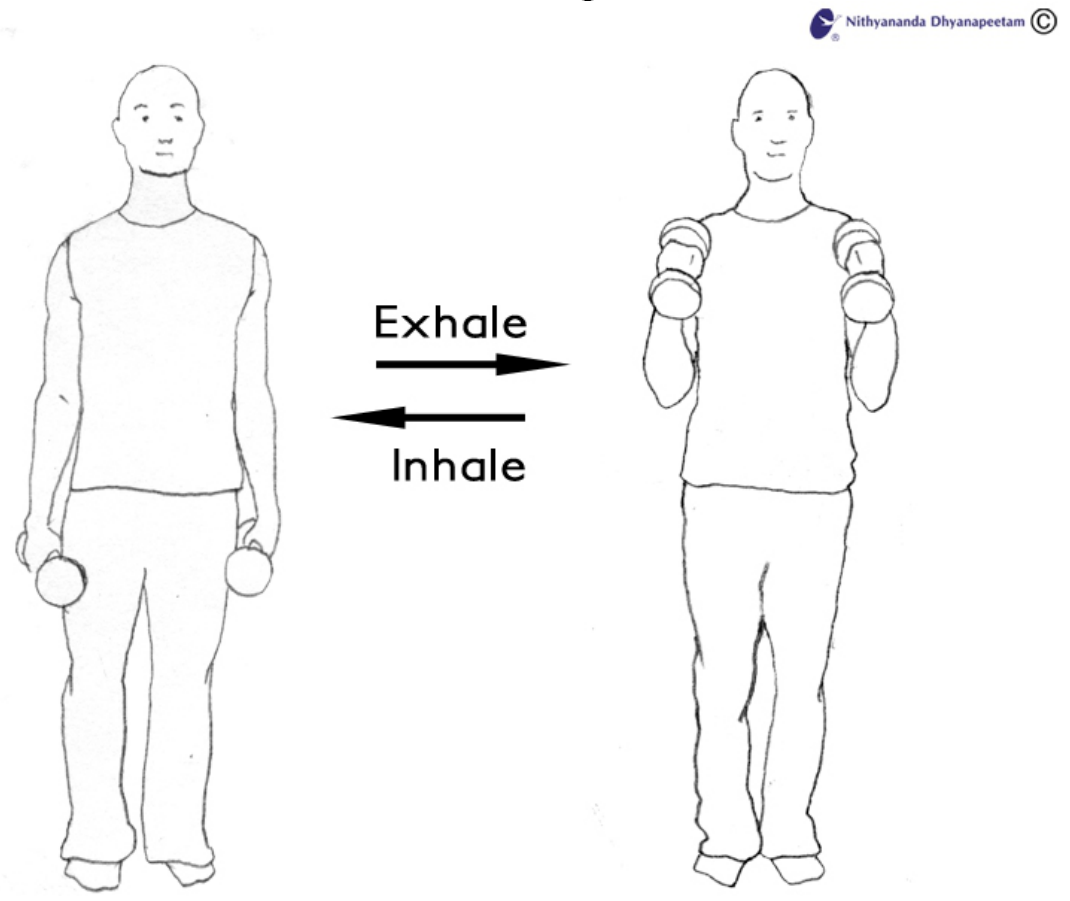
1. Start position – stand straight with the dumbbells by your side, palms facing the hips.
2. Bring the dumbbells up by keeping palms facing body. Keep the elbows close to the ribs, until the dumbbell plate almost touches your shoulder.
3. Remember to brace abdominals during the exercise.
Beginners – 12 – 15 reps x 2 sets. Intermediate – 8 – 12 reps x 2 –3 sets.
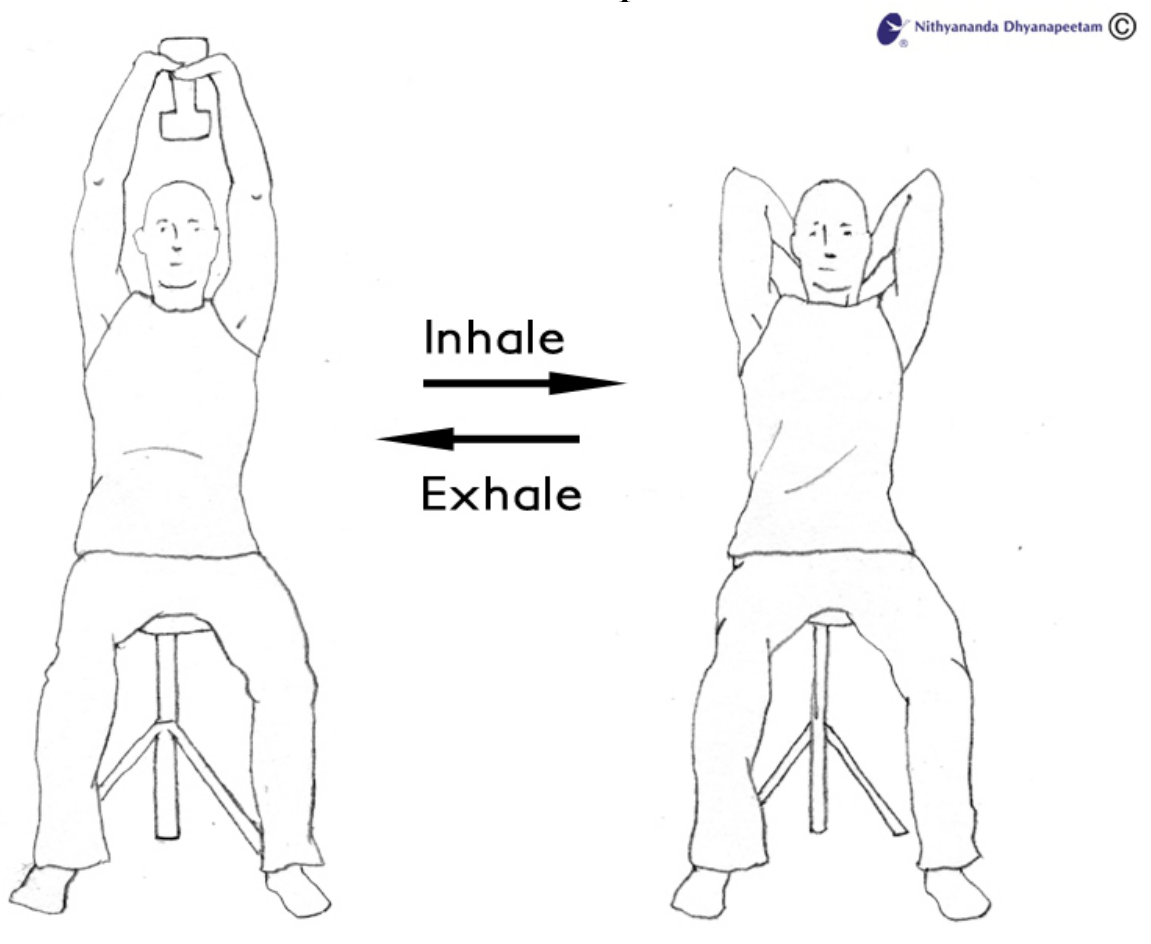
Exercise 3: Overhead Triceps Extensions – Seated or
Standing (1 dumbbell)
1. Sit upright on the edge of a sturdy chair, feet apart and flat on the ground. You can also either stand or sit in Vajrasana (kneeling down with spine straight).
2. Start position – Hold one dumbbell in a vertical position. Hold the upper plate portion, palms face up, hands in a “V-shape”. Extend the arms above the head. 3. Brace the abdominals to maintain posture throughout the exercise to avoid arching of lower back.
4. With arms extended, bend the elbows and carefully lower the dumbbell behind your head. Keep arms close to head.
5. As you exhale, extend the arms to press the dumbbell back to starting position. Keep the elbows and arms close to head during the extension of the arms.
6. Repeat desired number of reps.
Beginners – 12 – 15 reps x 2 sets. Intermediate – 8 – 12 reps x 2 – 3 sets.
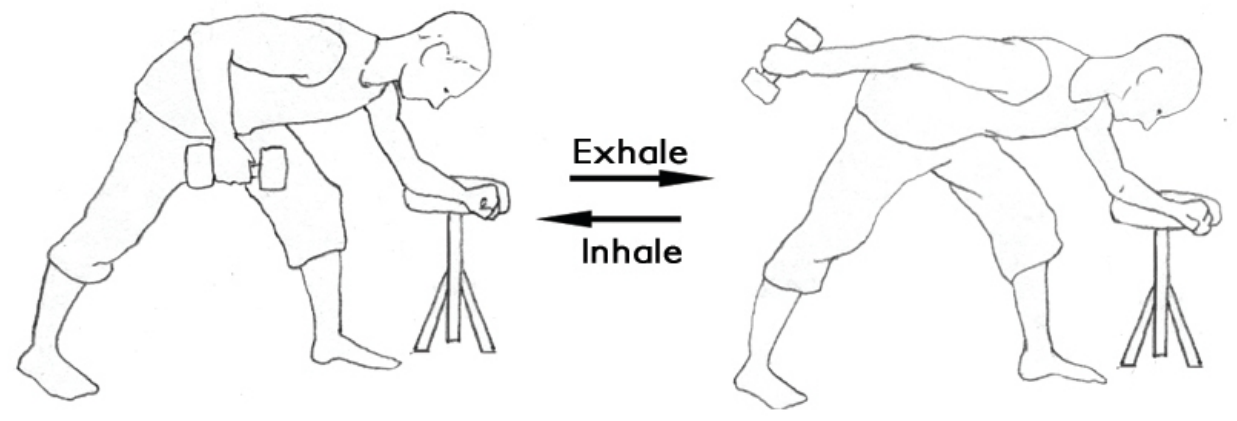
Exercise 4: Single Arm Triceps Kickback (1 dumbbell)
1. Start position – Stand straight. Step the right foot back. Bend the left knee, place left forearm either on the left thigh or on a chair. Keep the back straight and parallel to the ground. Pick up the dumbbell with your right hand armpit closed. Lift the elbow so that the upper arm is parallel to the ground. Keep the arm bent at 90°. Brace the abdominals strongly.
2. Keep the right upper arm firmly pressed against your body. Using your triceps muscles, extend and straighten the right arm parallel to ground lifting the dumbbell into the air. Brace the abdominals strongly as you lift the dumbbell up and back. Hold it up for a second squeezing the triceps.
3. Lower the dumbbell to the start position by bending the elbow. Do not swing the dumbbell or let it fall freely.
4. Repeat desired number of reps before changing the arms.
Beginners – 12 – 15 reps x 2 sets. Intermediate – 8 – 12 reps x 2 – 3 sets.
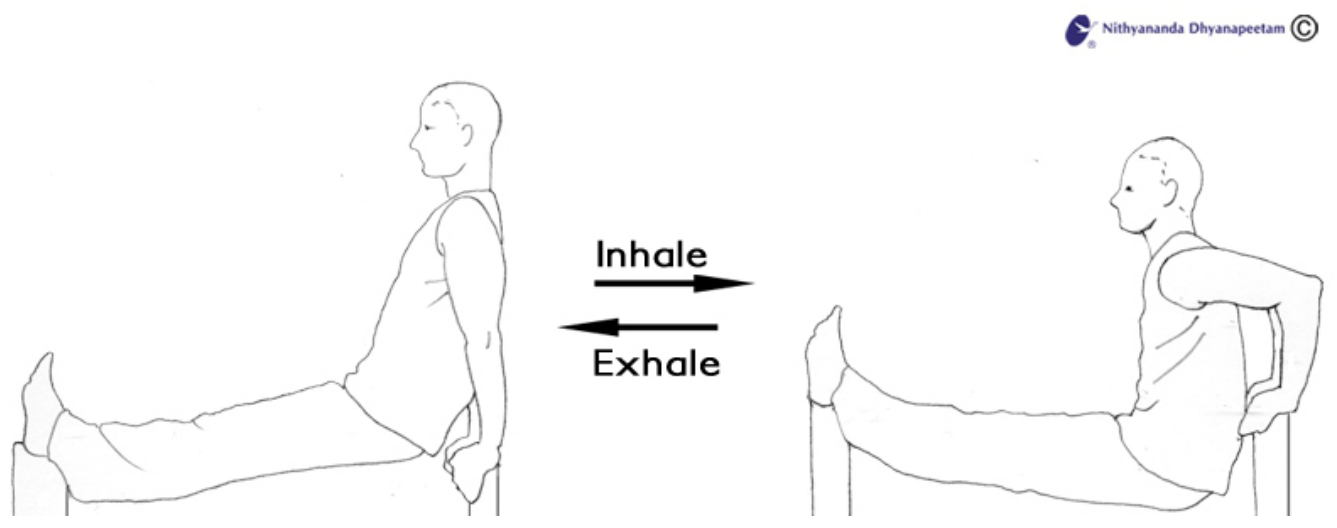
Exercise 5: Triceps dips
1. Use 2 benches or sturdy chairs. See image below.
2. Start position – Place the heels on the edge of one bench. Place your hands on edge of the other bench shoulder-width apart, fingers and thumbs pointing down. Arms are extended.
3. Dip down by bending your elbows till the arms reach a 90 degree angle. Keep the elbows pointing back and the body close to the chair. Avoid dipping too low to prevent unnecessary stress on the shoulder joints.
4. Push up slowly by extending your arms and squeezing the triceps back to the starting position.
Beginners – Do 5 reps x 2 sets. Intermediate – Do 10 reps x 2 – 3 sets.
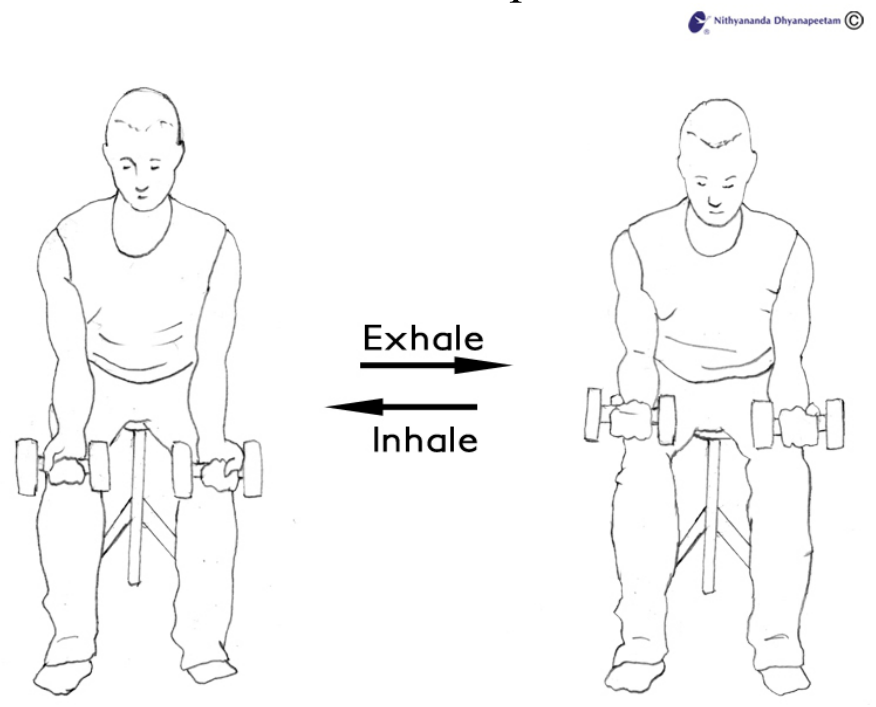
Exercise 6: Wrist Curls
1. Sit at the edge of either a low chair or bench. Legs are shoulder-width apart, feet firmly on the ground.
2. Lean forward till you can rest the elbows and forearms on your thighs, hands extend past the knees, palms facing up with light dumbbells in hands. Straighten your back and brace your abdominals.
3. Move the dumbbells up and down slowly, by flexing and extending at the wrists.
Beginners – 12 – 15 reps Intermediate – 8 – 12 reps x 2 sets.
Day 3 – Back
Caution! These back exercises may not be for you if you have had back surgery, back pain or injury. Please consult with your physician.
Total Duration: Approx. 60 min
1. Start with Pre-workout Session. See section 1 for instructions.
2. Go to Back Workout. See below for instructions
3. Go to Core Workout. See section 3 for instructions on Core.
4. Finish with Post-workout Session. See section 2 for instructions.
Back Muscles
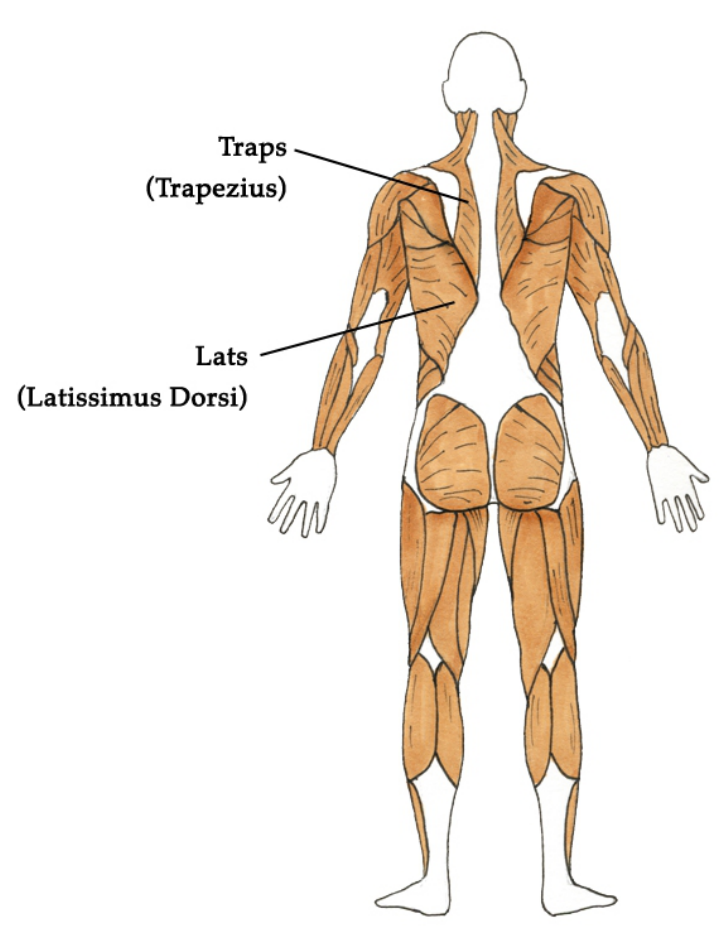
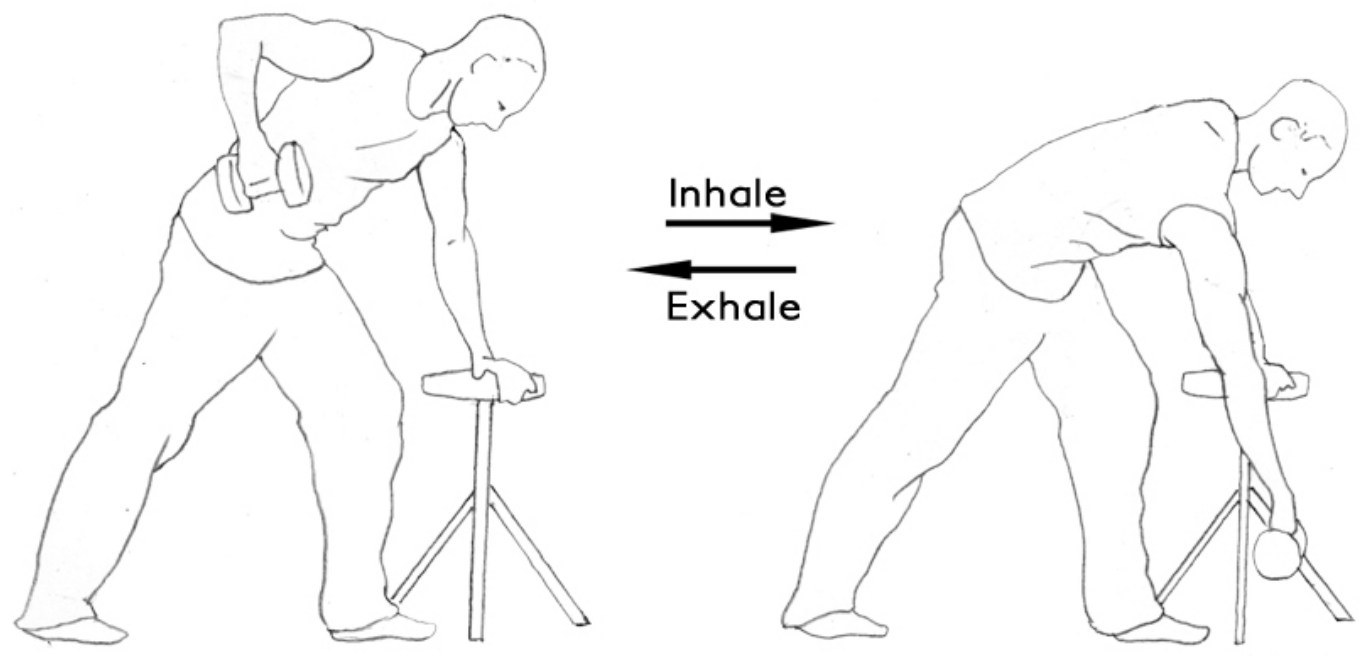
Exercise 1: Single Arm Row
1. Star position – Place the left hand on a low stool, legs wide apart, left leg is in front of the right. Hold the dumbbell in the right hand. If a bench is available, place the left knee and the left hand on the bench. Keeping the back straight and the belly tight, lean forward to lower the body. Let the dumbbell hang straight down beneath your shoulder. On the exhale, lift the dumbbell straight up towards the ribs by squeezing the muscles around your right shoulder blade area.
2. Keep the dumbbell close to the body. Do not over-rotate the torso. Hold for a second at the top of the movement.
3. Lower the dumbbell to the starting position in a controlled manner.
Beginners – Lighter weight. 12 – 15 reps x 2 sets Intermediate – Heavier weight. 8 – 12 reps x 2 – 3 sets
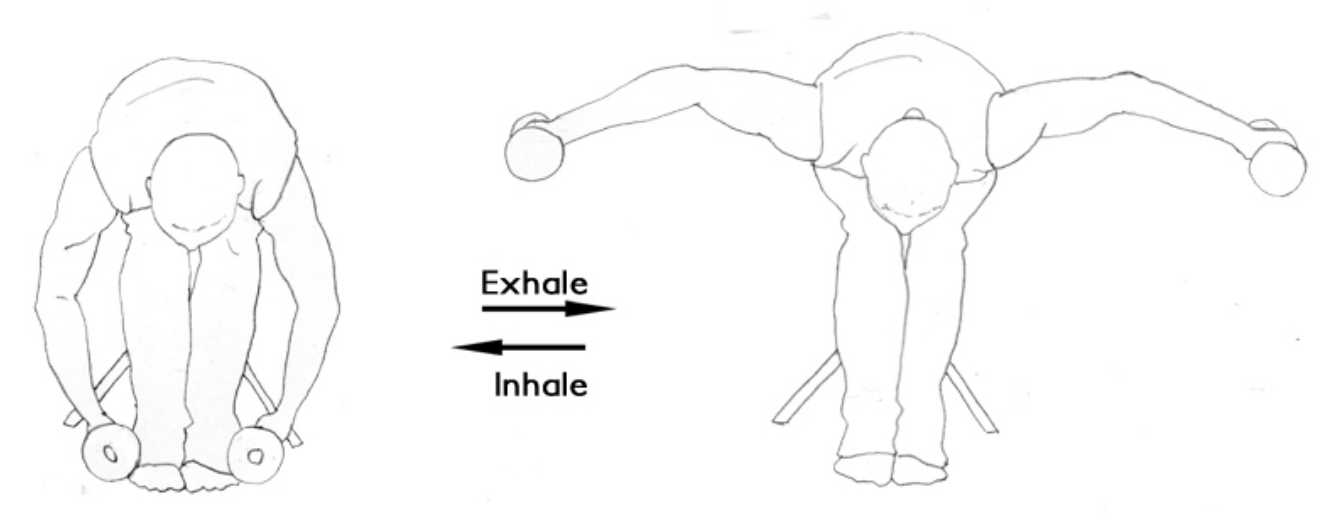
Exercise 2: Reverse Flies – Sitting
1. Start position – Sit on the edge of a chair, feet flat on the floor. Bend over so that the chest is resting on your thighs. The nose points to the floor. Keep the back straight by engaging the abdominals strongly.
2. Use lighter dumbbells. Hold the dumbbells beside the ankles. Bend the arms at elbows.
3. Using the muscles around the shoulder blades, back and side of the arms, lift your arms out to the side, not higher than shoulder level. Keep your arms bent at the elbows and brace the core muscles strongly.
4. Lower dumbbells in a controlled manner to start position.
Beginners – Lighter weight. 12 – 15 reps x 2 sets Intermediate – Heavier weight. 8 – 12 reps x 2 – 3 sets
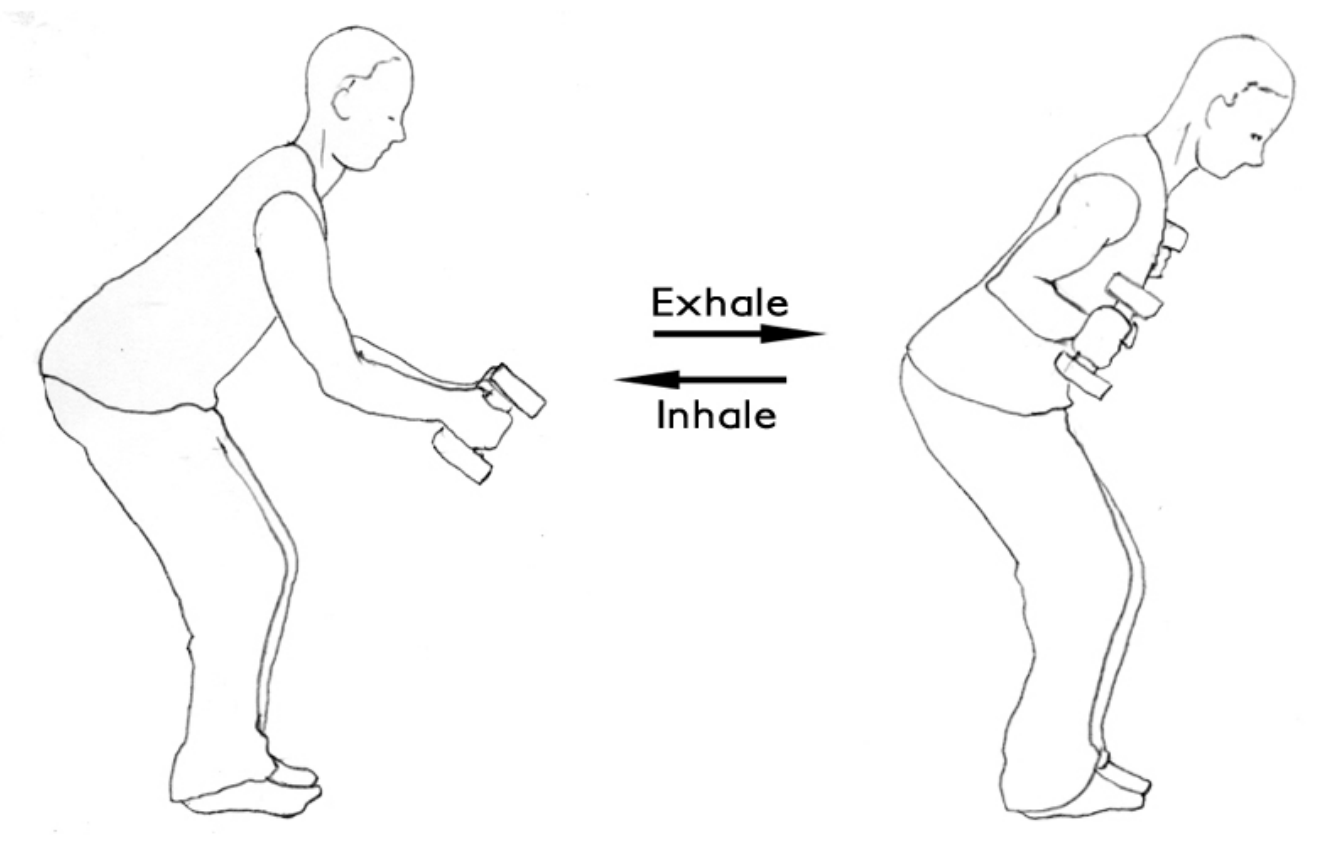
Exercise 3: Reverse flies in semi-squat position – For Intermediate Fitness
1. Start position – Stand with the feet parallel, in a semi-squat position with the torso bent forward in a 45-50° angle. Brace the abdominals strongly. Take the dumbbells in your hands. Keep arms bent at elbows.
2. Lift the arms out to the sides using the back muscle till upper arms are in line with the back and chest. Keep the elbows bent. Pause for a moment at the top of movement.
3. Lower the dumbbells to start position with controlled motion.
Beginners – Lighter weight. 12 – 15 reps x 2 sets Intermediate – Heavier weight. 8 – 12 reps x 2 – 3 sets
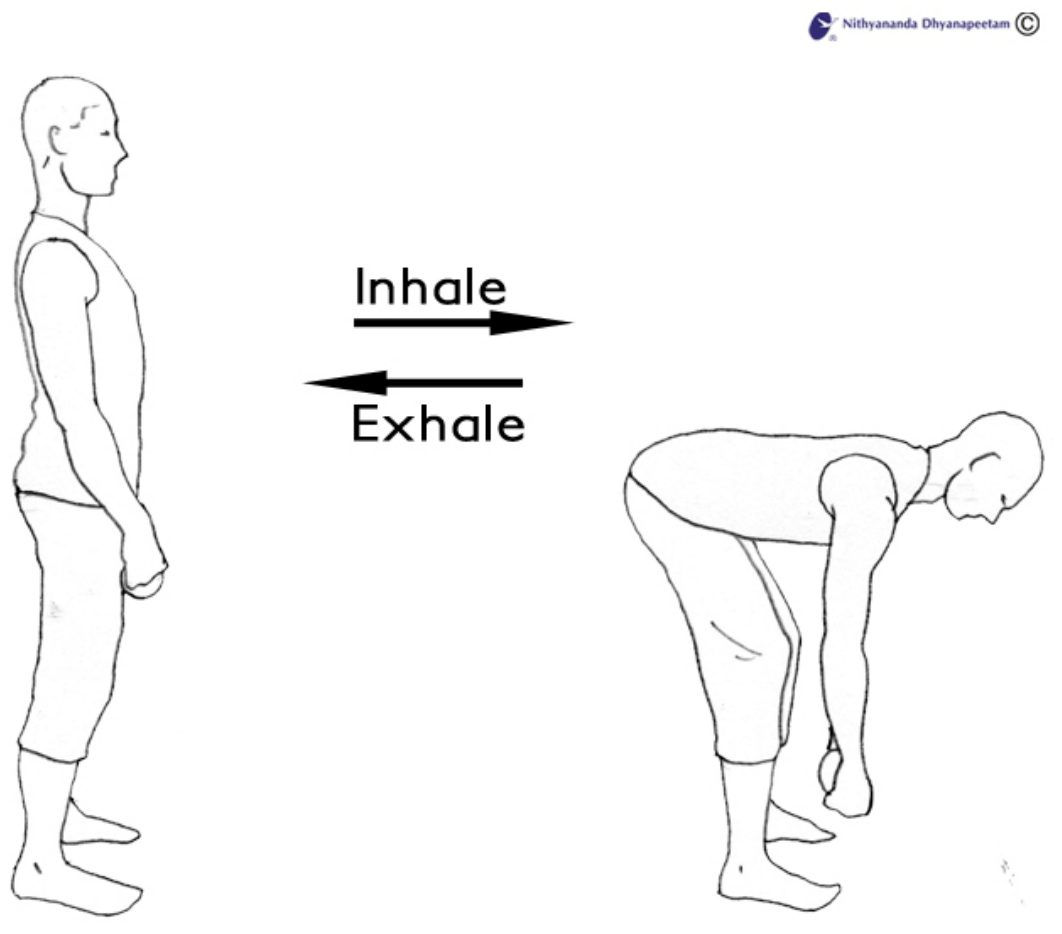
Exhale
Inhale
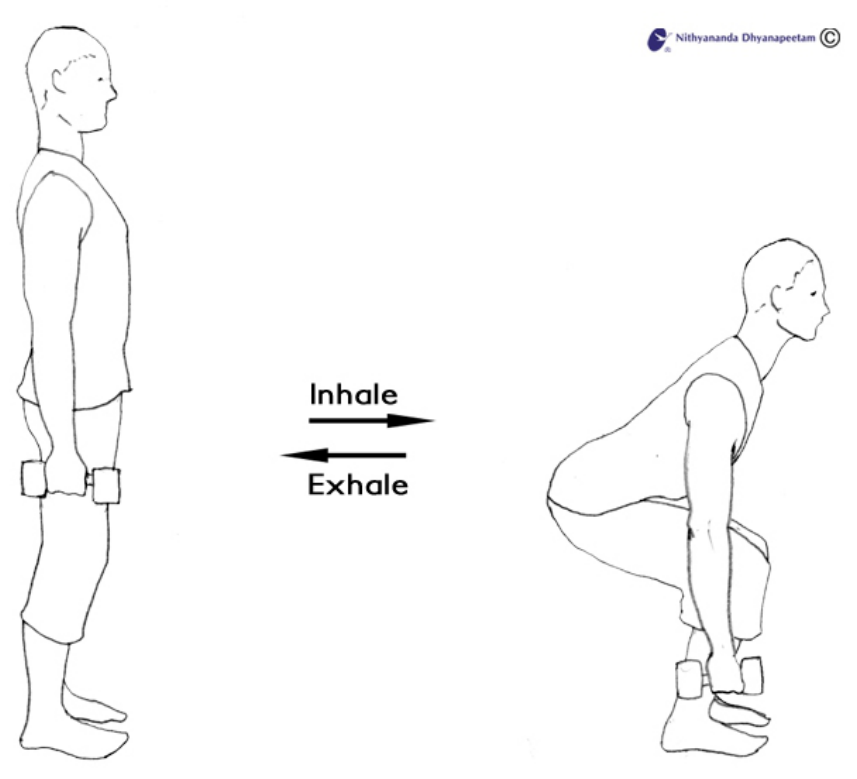
Exercise 4: Dead Lift
1. Start position – Use lighter weights. Stand straight, feet parallel and shoulder-width apart. Keep a slight bend at the knees; do not lock the knees. Hold the dumbbells in front of the legs, arms straight, palms facing the thighs. Beginners - place hands on hips without dumbbells.
2. Keeping the shoulders broad, belly braced and spine straight, bend forward from the hips in a controlled manner as you lower the dumbbells towards the floor as far as you comfortably can. Keep dumbbells close to legs as you lower them. Keep a slight bend in your knees. Beginners – keep hands on hips throughout the movement.
3. Brace the abdominals, contract the hamstrings (back of the thighs), buttocks (gluteals) and the lower back muscles to raise the upper body back to the start position.
Beginners – Lighter weight. 12 – 15 reps x 2 sets
Intermediate – Heavier weight. 8 – 12 reps x 2 – 3 sets
Day 4 – Shoulders
Total Duration: Approx. 60 min
1. Start with Pre-workout Session. See section 1 for instructions.
2. Continue to Shoulder Workout. See section below for instructions.
3. Continue to Core Workout. See section 3 for instructions on core.
4. End with Post-workout Session. See section 2 for instructions.
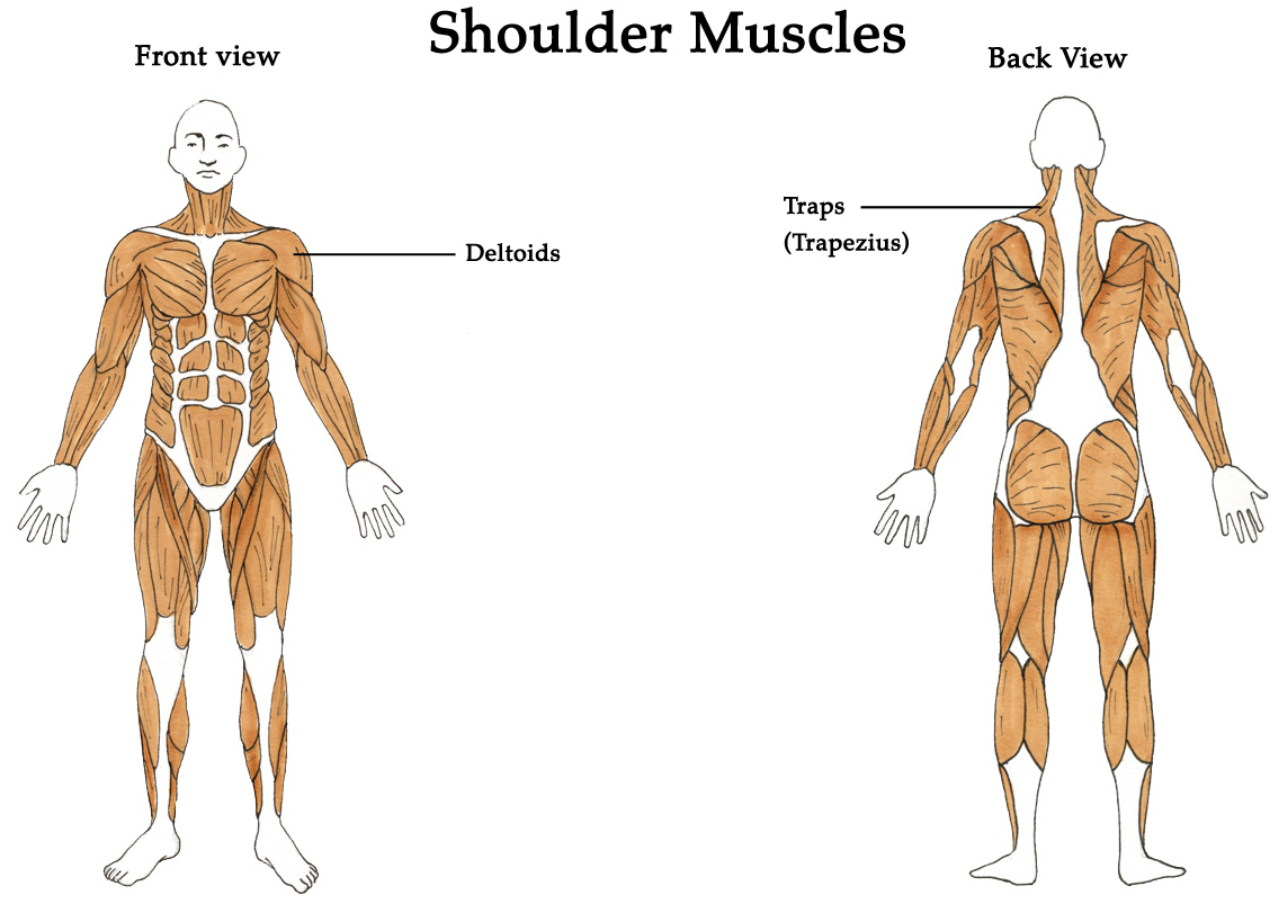
Shoulder Muscles
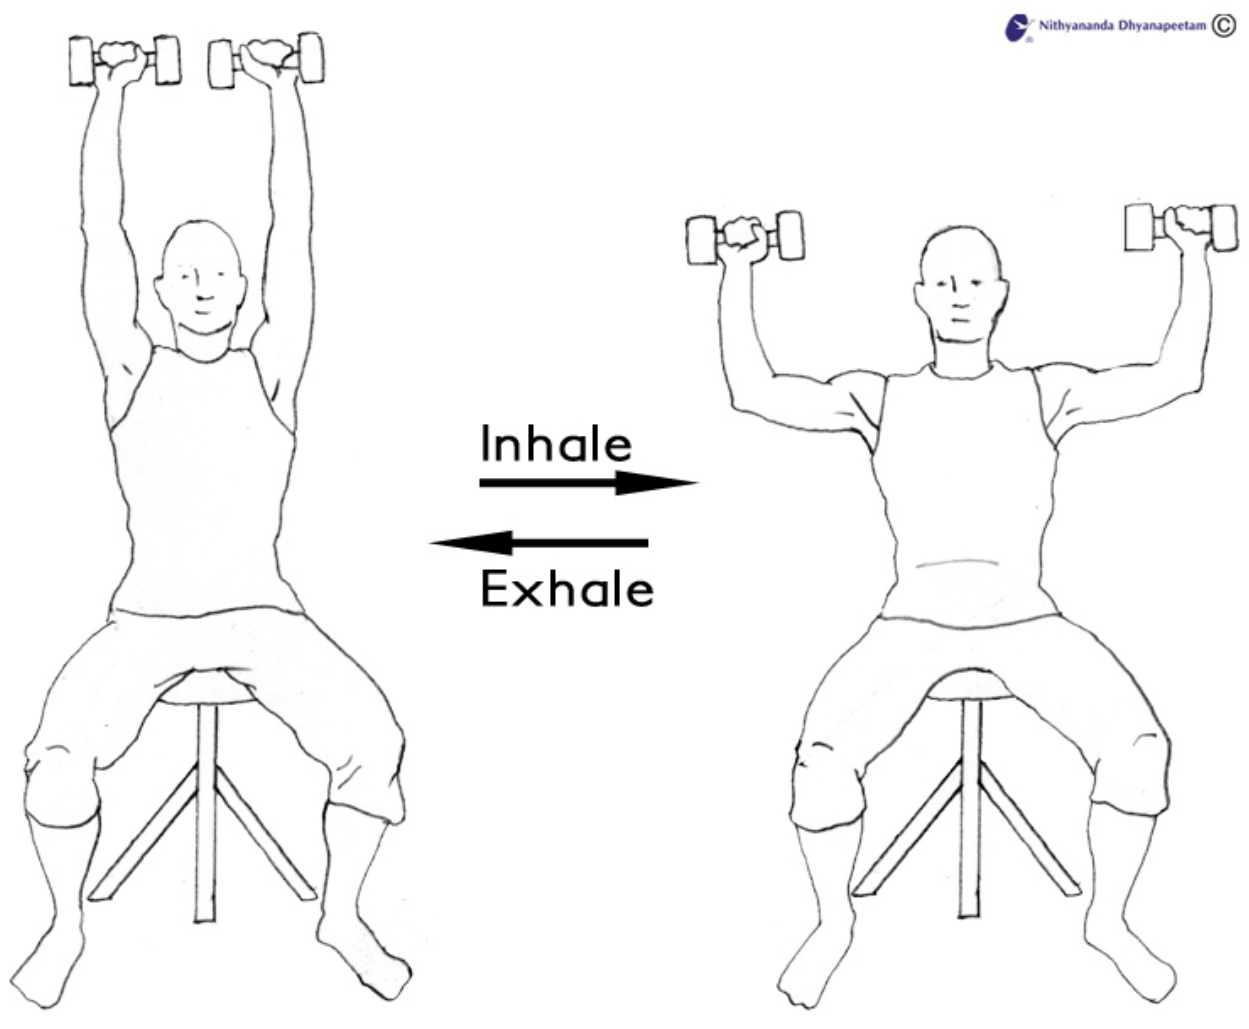
Exercise 1: Shoulder Press
1. Start position – Stand straight, feet parallel and hip-width apart, or sit on a bench with a straight back support, pressing the back against the back support. Keep the feet flat on ground. Press the dumbbells overhead, till they lightly touch by extending arms overhead.
2. Lower the dumbbells slowly to shoulder level. When you reach the shoulder level, press the dumbbells back to start position by extending your arms.
Beginners – Lighter weight. 12 – 15 reps x 2 sets Intermediate – Heavier weight. 8 – 12 reps x 2 – 3 sets
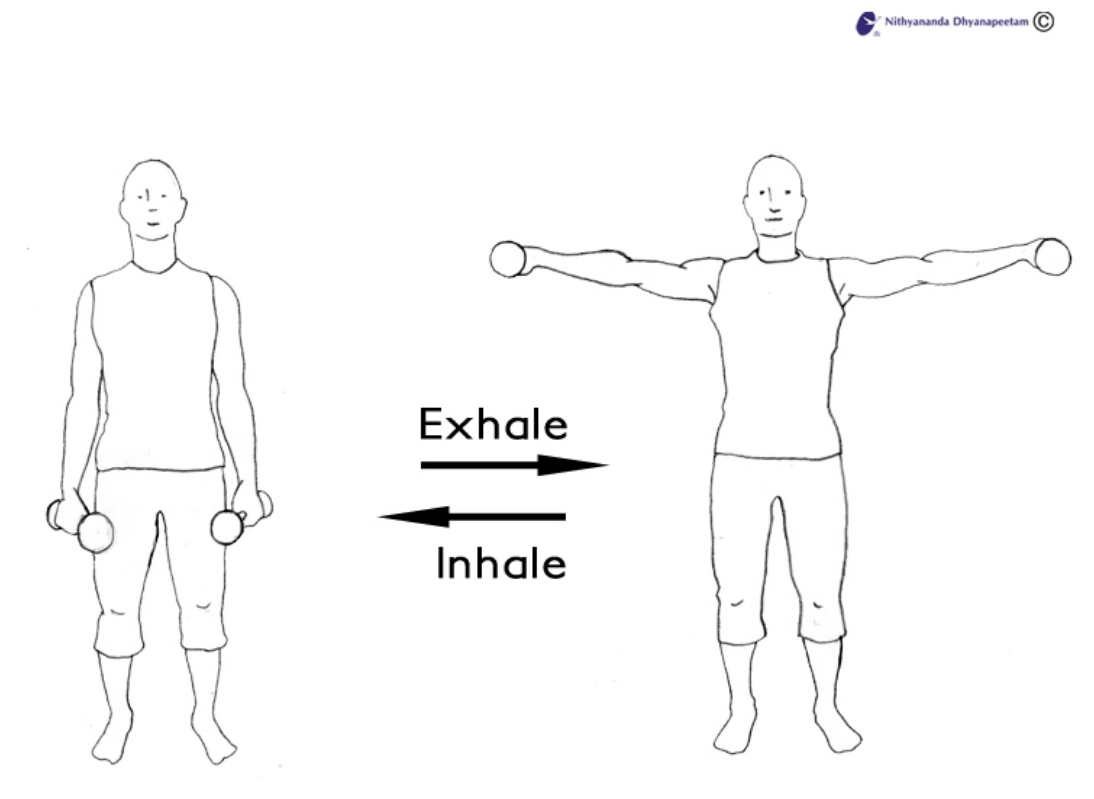
Exercise 2: Lateral Raise
1. Start position – stand straight, feet parallel and hip- width apart. Hold the dumbbells at your side, palms facing the legs, back straight. Brace the abdominal muscles.
2. Using the shoulder muscles, raise your arms up and out to the sides bracing the abdominals strongly. Keep the elbows bent slightly throughout the exercise. Raise the arms no higher than shoulder level.
3. Lower the arms to the starting position in a controlled manner.
Beginners – Lighter weight. 12 – 15 reps x 2 sets
Intermediate – Heavier weight. 8 – 12 reps x 2 – 3 sets
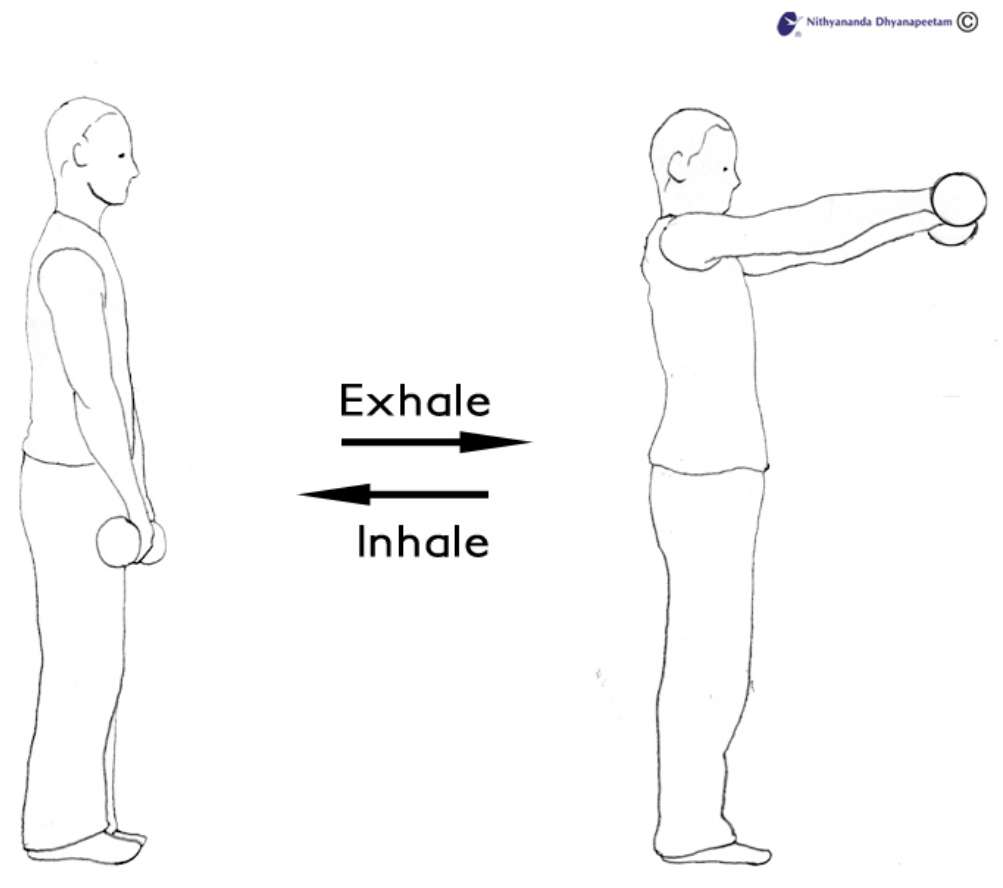
Exercise 3: Front Shoulder Raise
1. Start position – stand straight, feet parallel and hip-width apart, hold a dumbbell in each hand in front of your thighs, palms facing towards thighs.
2. Brace the abdominals strongly and raise both arms in front of you moving from the shoulders. Keep your elbows slightly bent. Pause a moment.
3. Lower both the dumbbells simultaneously in a controlled manner to the start position.
Beginners – Lighter weight. 12 – 15 reps x 2 sets Intermediate – Heavier weight. 8 – 12 reps x 2 – 3 sets
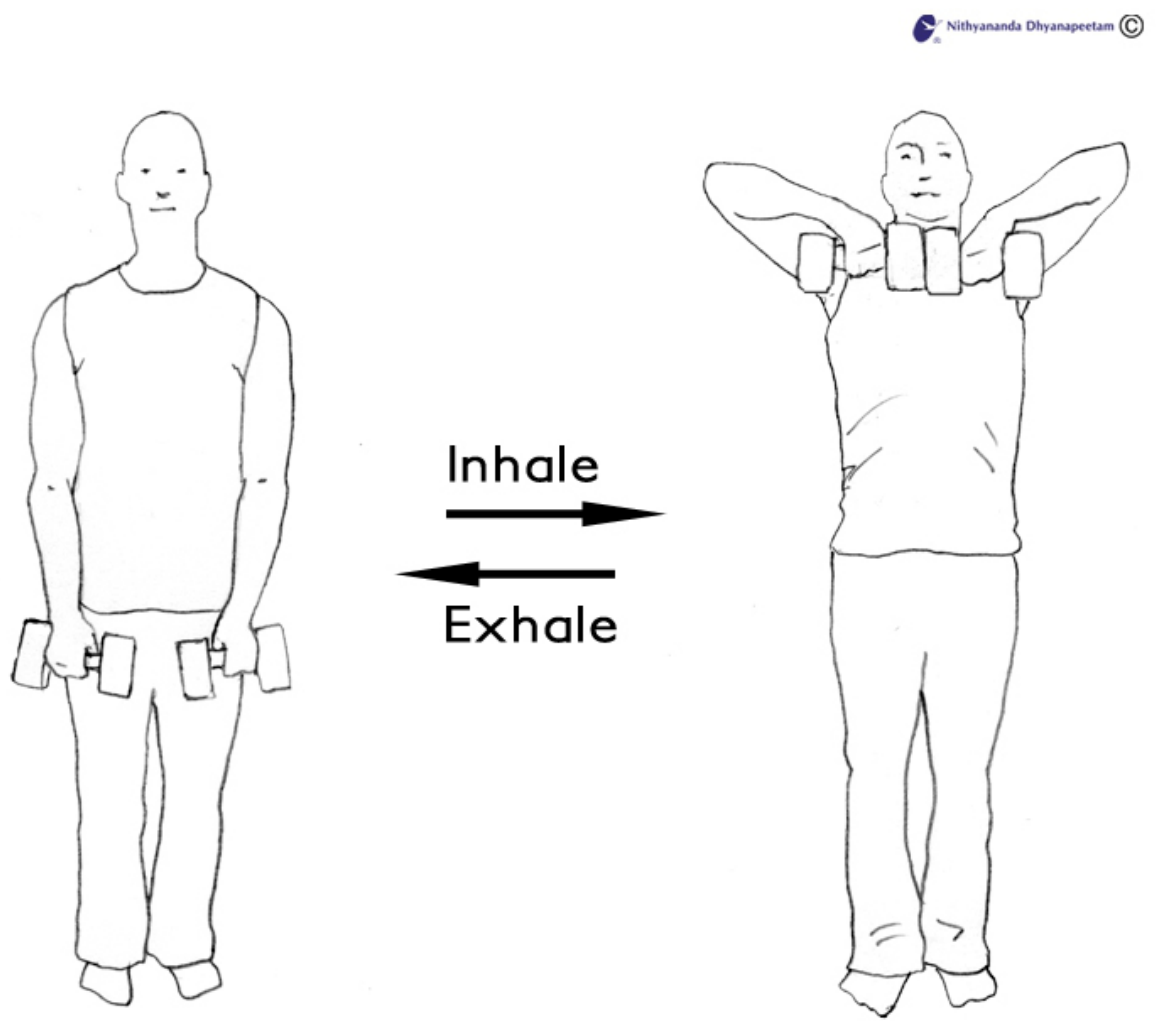
Exercise 4: Upright Rows
1. Start position: stand upright, place feet shoulder-width apart, knees slightly bent, palms facing the thighs, dumbbells in front of thighs, arms straight with elbows turned out to the side slightly.
2. Pull the dumbbells up along the front of the chest keeping the dumbbells close to your body. Let the elbows lead the movement by keeping them higher than the wrists.
3. Allow the wrists to flex as the dumbbells rise upwards no higher than collar bone, constantly keep the elbows higher than wrists. Pause at top of the movement, then lower the arms to the starting position by lowering the dumbbells down the front of the body.
Beginners – Lighter weight. 12 – 15 reps x 2 sets Intermediate – Heavier weight. 8 – 12 reps x 2 – 3 sets
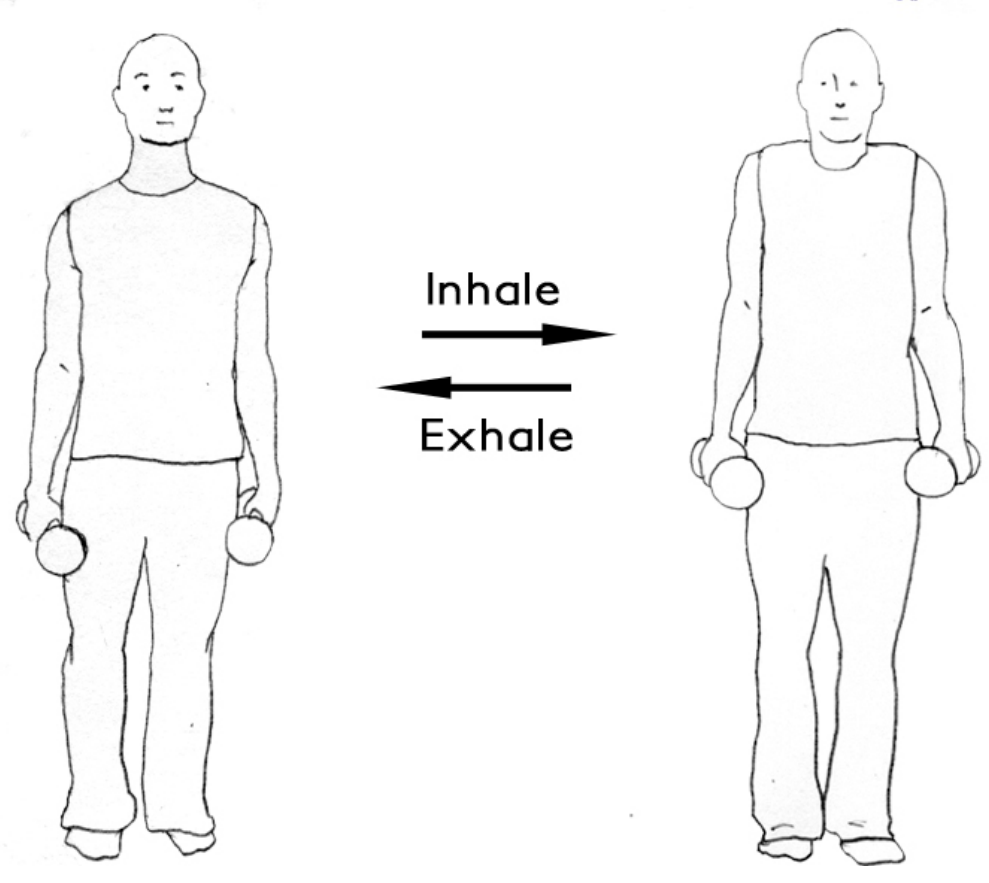
Exercise 5: Shoulder shrugs
- Start position – stand straight, feet parallel and shoulder-width apart.
- Keeping arms extended, 'shrug' the shoulders towards your ears pausing at the top shrug position before lowering the shoulders back to the starting position. It is an up and down movement as you 'shrug', not a circular motion.
Beginners – Lighter weight. 12 – 15 reps x 2 sets Intermediate – Heavier weight. 8 – 12 reps x 2 – 3 sets
Inhale
Exhale
Day 5 – Legs
Caution: Do not attempt these exercises if you have knee or back pain or knee surgery. Consult with your physician prior to the exercise.
Total Duration: Approx. 60 min
- Start with Pre-workout Session. See section 1 for instructions.
- Continue to Legs Workout. See section below for instructions.
- Continue to Core Workout. See section 3 for instructions on core.
- End with Post-workout Session. See section 2 for instructions.
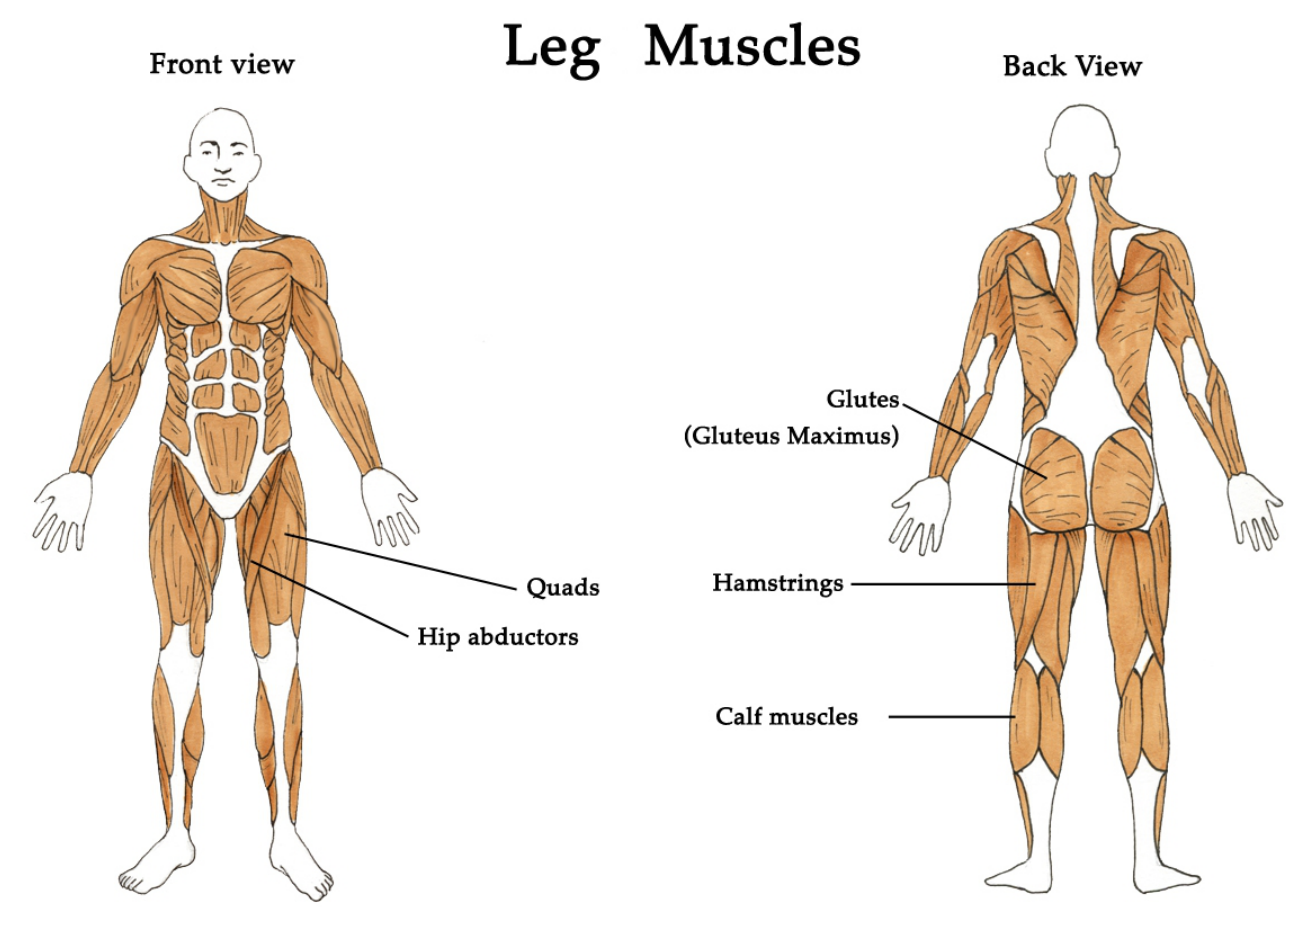
Leg Muscles
Exercise 1: Half Squat
1. Start position – stand upright, feet parallel and shoulder-width apart. Hold the dumbbells at your side, arms extended. Brace the abdominals strongly and keep the feet in the same position throughout the movement.
2. Squat down as if you were going to sit down on a chair behind you, sticking your buttocks to the back. Keep the spine straight, shoulders wide, eyes looking a few feet in front. Bend from the hips as you squat. You should be able to see your toes if you look down during the squat. Your knees are on top of the ankles or only slightly in front of the ankles during the half squat.
3. To come up, push down on the feet strongly against the floor, engage the thigh muscles, brace your abdominals, straighten the legs and come back up to the starting position.
Beginners – Lighter weight. 12 – 15 reps x 2 sets
Intermediate – Heavier weight. 8 – 12 reps x 2 – 3 sets
Variation – Plié Squats
- Start position – stand upright, back straight, look forward. Spread the legs wider than the width of your yoga mat, toes pointed out at about 45º (as in image above, with legs open). Rest the dumbbells on your hips elbows pointing back.
- Brace the abdominals, maintain a straight back as you squat in the wide stance. Knees are on top of your ankles or slightly behind your ankles. Knees point out in same direction as your toes as you squat. Pause for a moment in the down position before coming back up to the starting position.
Beginners – Without dumbbells on 1st set then with dumbbells on 2nd set. Lighter weight. 12 – 15 reps x 2 sets Intermediate – Heavier weight. 8 – 12 reps x 2 – 3 set
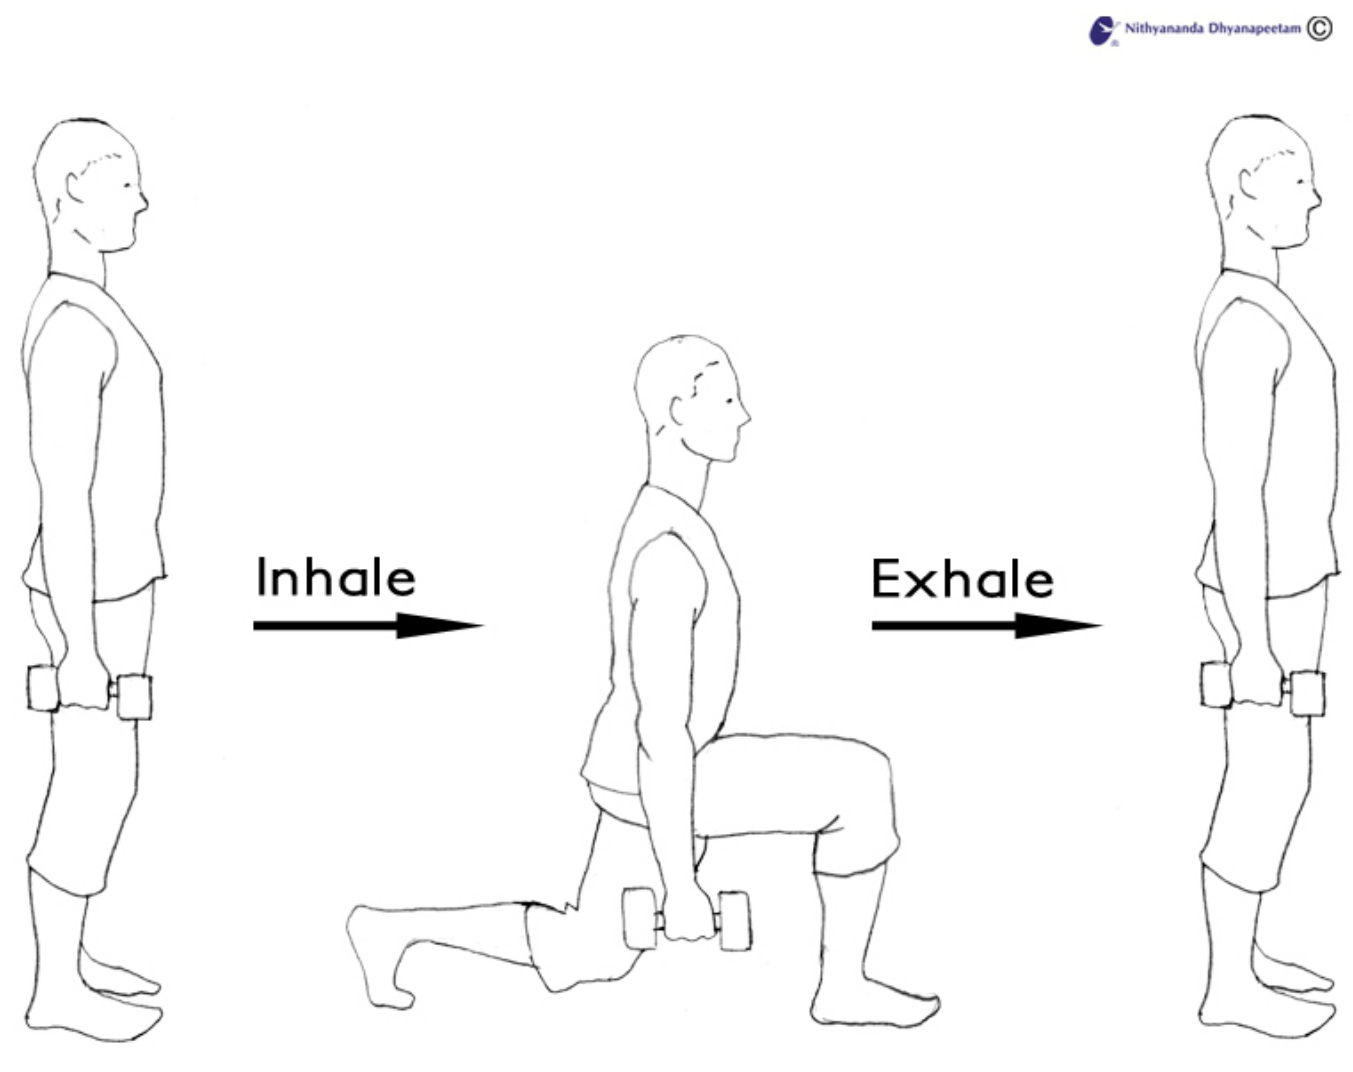
Exercise 2: Dumbbell Lunges
For the first 4 workout sessions, practice without carrying dumbbells.
- Start position – stand upright, feet parallel hip-width apart.
- Lunge forward with your left leg in a medium size step. Keep the ball of your back foot firmly anchored to the ground. Back is upright and body stable. Avoid leaning over the front leg. Pause for a moment to balance. Ensure that the front knee does not extend in front of ankle.
- Step the back foot forward to meet the front foot and come to a standing posture. Pause for a moment.
- Repeat lunge movement with right leg forward. Pause to stabilize the body. Then step the back leg forward to meet the front foot. 5. Alternate the legs as you are "lunging" forward. After a few lunges or when you run out of space, turn around and repeat lunge.
6. Repeat desired number of reps.
7. When using dumbbells, hold them in front of the waist to chest level with elbows bent and close to the body. Use light dumbbells.
Option – Lunge with right leg forward. Pause to stabilize body. Then bring right leg back to start position. Pause for a moment at the start position to balance. Lunge forward with your left leg now and repeat the movement. This variation keeps you in one spot on your mat.
Beginners – Without dumbbells for the first 2 sessions. Lighter weight. 12 – 15 reps x 2 sets Intermediate – Heavier weight. 8 – 12 reps x 2 – 3 set